Technology
18 Tips for Taking the Best Photos With Your iPhone

The iPhone is able to taking high-quality pictures and selfies proper out of the field. So you may often snap good pictures with no need to configure any settings. However there are a number of superior options and picture-taking methods that may show you how to seize really nice photographs.
Take into account that some choices can be found solely on sure mannequin iPhones. Apple usually enhances the digicam’s {hardware} with every new technology of iPhone, and also you get extra if you happen to purchase a extra premium mannequin. (Try our story evaluating the 4 iPhone 14 fashions.)
The next information will present you all of the options accessible within the Digital camera app in your iPhone and show you how to reap the benefits of your cellphone’s photo-taking prowess. For extra normal photo-taking suggestions, take a look at our story on how one can take higher pictures from any smartphone.
1. Replace Your iPhone
When was the final time you up to date your cellphone? Earlier than getting began, you need to replace your iPhone to the most recent model of iOS to make sure you have all the most recent and biggest choices out there. (And to repair any bugs that may pop up).
Go to Settings > Common > Software program Replace. You’ll be informed that the OS is updated or prompted to obtain and set up the most recent replace.
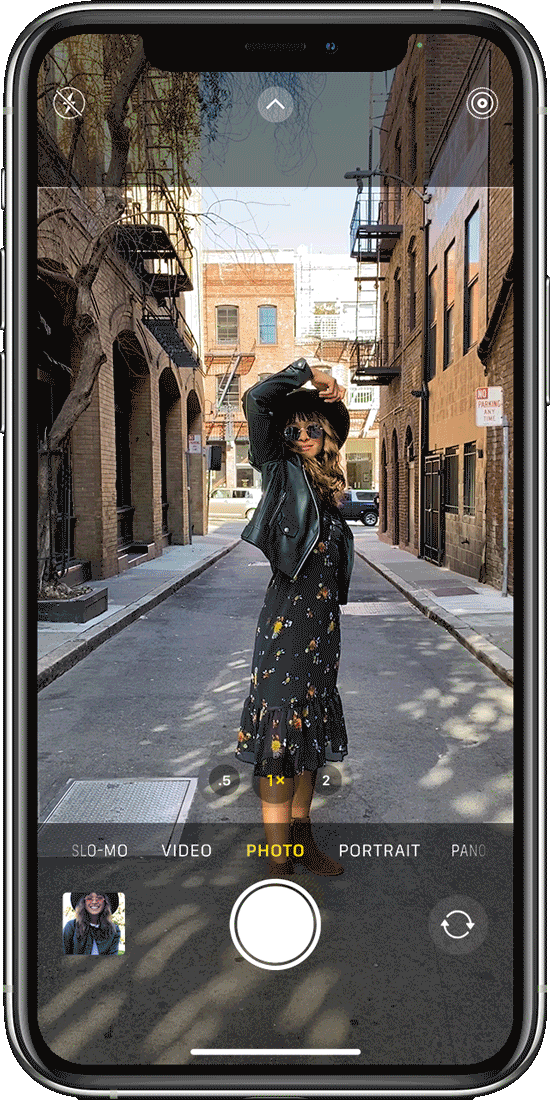
2. Navigate Picture Mode
As seen on the iPhone 14 Professional
(Credit score: Lance Whitney)
Now, open the Digital camera app to take a look at the completely different digicam modes. You may be in Picture mode by default. You’ll be able to simply zoom in or out by tapping one of many preset optical zoom settings on the display. To make use of the digital zoom, transfer your fingers aside or pinch them collectively and you may transfer in smaller increments.
If these default settings aren’t sufficient for you, press and maintain one of many preset zoom icons to entry the wheel zoom instrument. Right here, you may manually zoom by dragging your finger between the completely different presets.

As seen on the iPhone 14 Professional
(Credit score: Lance Whitney)
To modify between the rear and entrance digicam, simply faucet the Rotation icon within the decrease proper. Relying in your mannequin iPhone, you might be able to zoom out and in barely by tapping a double-arrow circle on the display or shifting your fingers aside or collectively.
3. Customise Composition

As seen on the iPhone 14 Professional
(Credit score: Lance Whitney)
Underneath Settings > Digital camera, you may also activate the swap subsequent to Grid if you wish to see a grid of squares seem on the digicam display to higher align sure topics and scenes. Allow Mirror Entrance Digital camera to take a selfie because the digicam sees it and never reversed.
Sure wide-angle lenses will distort the image you are taking, however Lens Correction will repair any distortion that seems in a photograph shot with the extremely vast or entrance cameras.
iPhone 11, 12, 13, and 14 fashions help you view content material exterior the body to indicate what could be captured with a unique lens. This selection could be managed from the View Exterior the Body possibility within the Digital camera settings.
4. Set Your Flash Choices

As seen on the iPhone 14 Professional
(Credit score: Lance Whitney)
Whereas in Picture mode, you may flip the flash on or off by tapping the lightning icon within the prime toolbar. Some fashions help you set the flash to computerized so it can activate if there is not sufficient pure mild out there. Some older telephones set these controls on the underside toolbar as an alternative.
To show these choices, faucet the up arrow on the prime or swipe up on the display. Faucet the primary icon on the toolbar to set the flash to auto, on, or off. If the flash is ready to computerized, and the flash icon modifications to yellow, meaning the flash will activate whenever you take an image.
5. Take Fast Movies With QuickTake
Seize video in Picture mode with out having to modify to Video mode because of the QuickTake function. Press and maintain the shutter button to immediately begin taking video. To unencumber your finger with out stopping the video, slide the shutter button to the suitable after which launch it.
6. Shoot Quicker

As seen on the iPhone X
(Credit score: Jason Cohen)
To take burst pictures, drag the shutter button to the left, or use the Quantity Up button, if you happen to flip the choice on through Settings > Digital camera > Use Quantity up for Burst. Or go to Settings > Digital camera and allow Prioritize Quicker Capturing to robotically seize extra pictures whenever you hold tapping the Shutter button.
7. Play With Portrait Mode

As seen on the iPhone 14 Professional
(Credit score: Lance Whitney)
Utilizing the underside toolbar, scroll to Portrait mode so you may shoot studio-quality portraits by taking a extremely detailed picture of your topic within the foreground whereas conserving the background softer and out of focus. As you line up your shot, the app will provide tips and strategies that will help you higher body the topic.
You’ll be able to regulate the zoom, flash, and (if out there in your mannequin iPhone) the depth of area from the F cease icon. Transferring the slider on the dimensions on the backside determines how blurry you’d just like the background to look.

As seen on the iPhone 14 Professional
(Credit score: Lance Whitney)
Faucet the lighting impact icon on the display to flick through the results and select a particular one, comparable to Pure Gentle, Studio Gentle, Contour Gentle, Stage Gentle, Stage Gentle Mono, or Excessive-Key Gentle Mono. If you happen to take an image and do not just like the impact, you may also change it after the very fact.
Select an image out of your digicam library. The photograph will show the phrase Portrait on the prime to point that you just shot it in Portrait mode. Faucet Edit. Faucet the lighting impact icon within the prime left to flick through the results once more and select one thing completely different. You can too faucet the depth icon to vary the main focus of the background.
8. Seize Panoramic Pics With Pano Mode

As seen on the iPhone 14 Professional
(Credit score: Lance Whitney)
From the underside toolbar, swap to Pano mode to seize a panoramic image by slowly shifting your cellphone alongside a large scene. If you’re able to take the panoramic image, faucet the Shutter button after which slowly transfer your cellphone as proven on the display till you seize the complete image.
Ensure you maintain the cellphone regular and degree by conserving the arrow as straight as potential on the horizontal line. Every part is then compiled into one prolonged photograph. View your photograph in panorama mode to expertise the complete scale of it.
9. Go for Gradual-Mo Mode

As seen on the iPhone 14 Professional
(Credit score: Lance Whitney)
If you happen to choose Gradual-Mo mode, it may be used on the back and front cameras to decelerate the motion. These with an iPhone 8 or newer can swap between 120 and 240 frames per second by tapping the quantity within the upper-right nook of the display.
Faucet the Rotation icon within the decrease proper to modify between the entrance and rear cameras. Faucet the Shutter button to start out and cease the video, or transfer the button to the suitable to lock it in place. You can too zoom out and in whereas recording.
10. Take a Time-Lapse Video

As seen on the iPhone 14 Professional
(Credit score: Lance Whitney)
Set the cellphone to Time-Lapse mode, and you may shoot movies that pace up the motion whenever you play them again. Seize storm clouds rolling in, your progress as you get your hair minimize, or a drive on a winding highway, for instance. You’ll probably need to hold the cellphone regular and supported, so a tripod could also be finest for longer captures.
Faucet the arrow on the prime to show the Publicity scale, if you happen to want to regulate it. Faucet the Rotation icon within the decrease proper to modify between the entrance and rear cameras. Faucet the Shutter button to start out the method, then faucet it once more to cease it.
11. Grasp Night time Mode

As seen on the iPhone 14 Professional
(Credit score: Lance Whitney)
Launched with the iPhone 11, Night time mode helps you to take high-quality pictures in low-light circumstances. You do not even need to do something to activate Night time mode; if the cellphone detects low mild, a moon-shaped icon will seem on the display indicating that Night time mode is on.
To take photos utilizing Night time mode in low-light conditions, your iPhone extends the shutter for a number of seconds longer than regular. This ensures that the lens brings in the correct amount of sunshine to get a greater picture. The quantity subsequent to the icon signifies how lengthy you should maintain the cellphone in place earlier than the digicam takes the image.
Faucet that icon, and the Night time mode scale seems on the backside, permitting you to manually set the publicity. Swipe the vertical line on the dimensions to regulate the publicity time, usually wherever from one to a few seconds. Nevertheless, you may get publicity instances as excessive as 30 seconds in case your iPhone is on a tripod.
12. Go Small With Macro Management

As seen on the iPhone 14 Professional
(Credit score: Lance Whitney)
The iPhone 13 Professional, iPhone 13 Professional Max, iPhone 14 Professional, and iPhone 14 Professional Max provide a macro management in Picture mode via which you’ll be able to seize pictures of small and up-close objects. When macro management is on the market, a yellow flower icon seems on the left. Faucet that icon on and off to see what the distinction could be with macro management lively or inactive.
If you happen to don’t see the macro icon on the display when making an attempt to snap a small object up shut, go to Settings > Digital camera and activate the swap subsequent to Macro Management.
Advisable by Our Editors
13. Change Up Your Dwell Pictures

As seen on the iPhone 14 Professional
(Credit score: Lance Whitney)
Dwell Pictures add movement to your otherwise-still photographs by recording what occurs 1.5 seconds earlier than and after you are taking a photograph. To allow it, faucet the bullseye icon on the prime of the display earlier than you are taking the shot.
After snapping a photograph, you may decide how that movement shall be used. In your digicam roll, discover the Dwell photograph you need to regulate and faucet the Dwell icon within the higher left to pick out a desired impact. Loop permits the video to loop endlessly, Bounce takes a web page from Instagram’s Boomerang to bounce backwards and forwards, whereas Lengthy Publicity provides SLR-like results to pictures.
To edit a Dwell Picture, open the picture in your digicam roll and faucet Edit. Select the Dwell icon and use the slider to decide on a begin and finish level. If you discover your required body, faucet Make Key Picture and that may turn out to be your default nonetheless picture.
Edits are nondestructive, so you may return and provides a photograph a very completely different look if you find yourself not liking your first take. Simply faucet into the photograph in query and choose Revert. Dwell Pictures do eat into your cellphone storage, nonetheless. To show it off, faucet the Dwell Pictures icon once more.
14. Management HDR (If You Can)

As seen on the iPhone X
(Credit score: Lance Whitney)
In case you have an iPhone 8 or greater, Apple makes use of Excessive Dynamic Vary (HDR) to enhance your pictures; iPhone 12, 13, and 14 fashions additionally use HDR to seize video. Sure iPhone fashions present an HDR icon within the upper-right nook of the display whenever you go to take an image. With it enabled, your cellphone takes a number of pictures at a time and blends them collectively to convey out the most effective options.
On iPhone XS, iPhone XR, iPhone 11 fashions, iPhone SE (2nd gen), and iPhone 12 fashions, you may faucet the HDR button to show it on or off. For the iPhone 8, iPhone 8 Plus, and iPhone X, you should open Settings > Digital camera, then flip off Auto HDR. With the iPhone 13 sequence and better, HDR is robotically added to your pictures so you may now not manually flip it on and off.

As seen on the iPhone 14 Professional
(Credit score: Lance Whitney)
In Picture, Portrait, Slo-Mo, or Time-Lapse mode, the underside toolbar will help you management particular settings. To show it, faucet the up arrow on the prime or swipe up on the display. Relying on what mode you’re in, the toolbar will show as many as six icons, together with ones for Flash, Dwell Picture, Publicity, Night time Mode, and a Self Timer to snap a photograph in 3 or 10 seconds.

As seen on the iPhone 14 Professional
(Credit score: Lance Whitney)
Faucet the Type icon after which swipe from one display to a different to modify amongst completely different photographic types, comparable to wealthy heat, vibrant, heat, and funky. To regulate a particular filter, faucet the Tone or Heat graph under and swipe the slider to the left or proper.

As seen on the iPhone 14 Professional
(Credit score: Lance Whitney)
Faucet the facet ratio icon and you may swap amongst completely different ratios, comparable to 4:3, sq., and 16:19.
16. Change Picture Codecs

As seen on the iPhone 14 Professional
(Credit score: Lance Whitney)
You’ll be able to change the format your photos use by default. Go to Settings > Digital camera > Codecs and select whether or not your photographs will use Excessive Effectivity (the HEIF/HEVC format) or Most Appropriate (the JPG format). HEIF/HEVC is a smaller and extra environment friendly format however might not be as suitable as JPG if you happen to want to switch your pictures to non-Apple working techniques and units.
In sure circumstances, although, pictures in HEIF/HEVC shall be transformed to JPG relying on the way you ship or share them. If you should protect house in your iPhone, strive the setting for HEIF/HEVC; in any other case keep on with JPG for larger compatibility.

As seen on the iPhone 14 Professional
(Credit score: Lance Whitney)
With the iPhone 12 Professional and later, you may seize pictures in RAW format, which provide greater high quality and larger flexibility for enhancing however take up more room than pictures saved as JPGs. Underneath the Picture Seize, activate the swap subsequent to Apple ProRAW if you happen to want to seize pictures in RAW format. You’ll be able to then choose to avoid wasting them as 12- or 24-megapixel information, noting that the 24MP information take up more room.
17. Protect Your Default Digital camera Settings

As seen on the iPhone 14 Professional
(Credit score: Lance Whitney)
By default, your digicam’s settings will reset every time you allow the Digital camera app. To make them everlasting, go to Settings > Digital camera > Protect Settings. Activate choices for entries like Digital camera Mode, Artistic Controls, Publicity, Night time Mode, Portrait Zoom, Motion Mode, or Dwell Picture. Your digicam will now retain the final settings you select for these options.
18. Swap Photographic Kinds

As seen on the iPhone 14 Professional
(Credit score: Lance Whitney)
If you happen to desire your colours a sure means, head to Settings > Digital camera and faucet the Photographic Kinds hyperlink. Swipe via every type and select the default tone and heat for the colours in your pictures. No matter which one you choose because the default, you may all the time swap to a unique type for particular person pictures.
Apple Fan?
Join our Weekly Apple Temporary for the most recent information, opinions, suggestions, and extra delivered proper to your inbox.
This text could include promoting, offers, or affiliate hyperlinks. Subscribing to a publication signifies your consent to our Phrases of Use and Privateness Coverage. It’s possible you’ll unsubscribe from the newsletters at any time.
/cdn.vox-cdn.com/uploads/chorus_asset/file/23267909/jtuohy_220222_5043_0003.jpg)
’Tis the season of travel, and if you want to beef up your home security ahead of your vacation, today might be a good time to do so. Right now, you can pick up a Blink Video Doorbell with a Sync Module 2 at Best Buy, The Home Depot, and Kohl’s for just $41.99 ($28 off), which is one of the lowest prices we’ve seen on the entry-level smart home bundle.
If you’re looking for a budget-friendly video doorbell, the battery-powered Blink Video Doorbell is one of our favorite models. The 1080p doorbell delivers all the basics, including support for motion detection, two-way video, and night vision. What’s most notable about this deal, though, is that the bundle includes Blink’s Sync Module 2, which is an optional $49.99 add-on that allows for free local storage and on-demand live views. Those are features you’d otherwise have to pay a subscription fee for, which makes some of the tradeoffs — including the doorbell’s lack of smart alerts and the fact it only works with Amazon Alexa — a little easier to overlook, especially at this price.

Emojis can be a fun and lighthearted way to add some “emotion” to your text messages or emails. Emojis have come a long way; back in the day, all you could really do was send a smiley face, sad face or winky face by using colons, semicolons and parentheses. Now, you can send all sorts of emojis, not just faces, but images of foods, objects, landmarks, you name it, to liven up your message.
But how do you add them? Though some devices and platforms make it easy to add emojis to messages, this isn’t the case across the board. What was meant to be a fun addition to your texting experience is now becoming a frustration.
GET SECURITY ALERTS, EXPERT TIPS – SIGN UP FOR KURT’S NEWSLETTER – THE CYBERGUY REPORT HERE
Emojis on iPhone (Kurt “CyberGuy” Knutsson)
How to add emojis in text messages
Adding emojis in text messages is relatively easy. Just open up your SMS messaging app, and at the bottom of the conversation where you input your text, look out for a smiley face icon. When you click on it, you’ll see the option for Emoji, stickers and GIFs. Click on “Emoji” and browse the long list of them.
You can scroll all the way down to find which Emoji you want or click on the different icons that symbolize separate categories. You can also search for what you’re looking for in the “Search Emoji” box.
HOW TO REMOVE YOUR PRIVATE DATA FROM THE INTERNET
To add emojis on Android
- Open any messaging app.
- Tap the text field where you type your message.
- Press the smiley face icon on the keyboard to open the emoji keyboard.
- Swipe through the categories or use the search feature to find an emoji.
- Tap the emoji to insert it into your message.
To add emojis on iPhone
- Open your messaging app and go to a conversation.
- Tap the text input field.
- Press the emoji button on the keyboard (it looks like a smiley face).
- You will be taken to the emoji keyboard, where you can select or search for emojis.
- Tap an emoji to add it to your text.
HOW TO TYPE FASTER AND EASIER WITH ONE HAND ON YOUR IPHONE
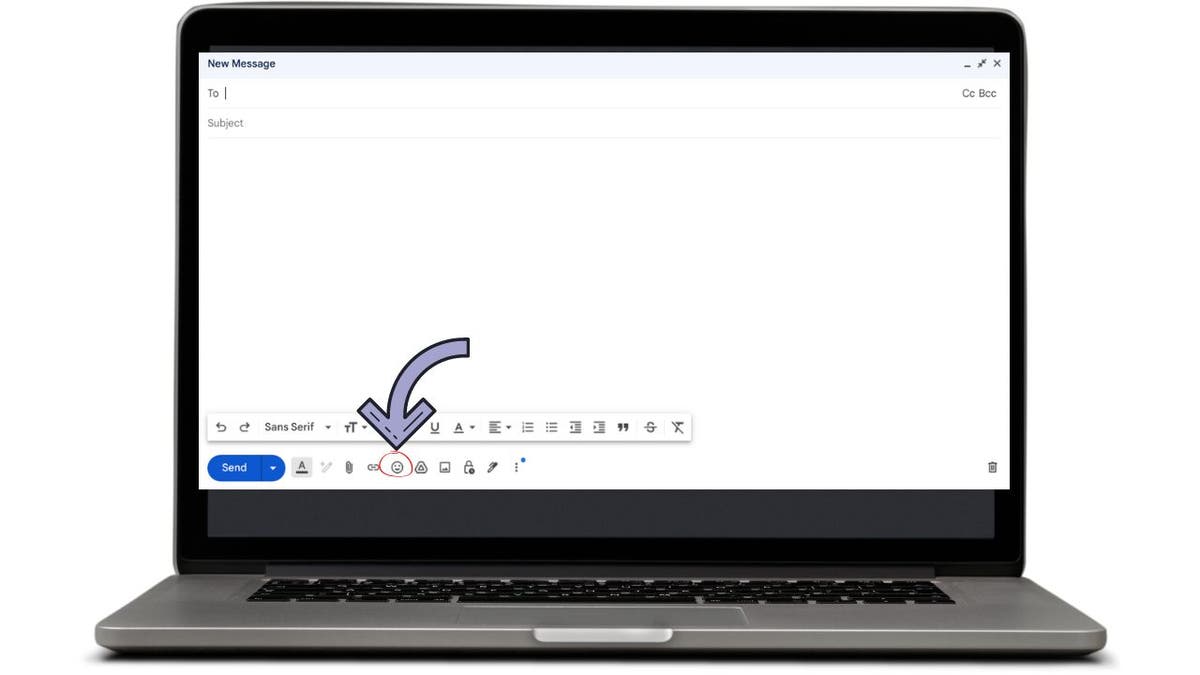
How to add emojis in emails
Emoji icon on PC (Kurt “CyberGuy” Knutsson)
To add emojis on Gmail
- Open Gmail and start composing a new email or reply to an existing one.
- Click on the smiley face icon in the lower part of the email composition box (next to the formatting options).
- A pop-up window with emojis will appear. Select the emoji you want to insert into your email.
To add emojis on AOL
- Log into your AOL Mail.
- Start composing a new email.
- Click on the emoji icon (often found in the formatting toolbar).
- Select the emoji you want to include in your email.
To add emojis on Yahoo! Mail
- Open Yahoo! Mail and begin composing a new email.
- There is an emoji icon in the toolbar at the bottom of the compose window. Click it.
- A menu with emojis will appear. Click on an emoji to insert it into your email.
BEST ACCESSORIES FOR YOUR PHONE
How to add an emoji to a subject line
Adding emojis to a subject line is not as straightforward as adding them to an email. You’ll need to first insert the emoji you want into the body of the email or copy it from an emoji website. Then, highlight the emoji, copy it and paste it into the subject line. Doing so can draw attention to your email with a subject line that stands out.

Emojis (Kurt “CyberGuy” Knutsson)
ARE YOU USING THESE EMOJIS CORRECTLY?
How many emojis exist?!
In total, there are 3,782 emojis in the Unicode Standard as of September 2023, according to Emojipedia. This website is also where you can find the complete index of all the emojis that exist. Here are some additional key emoji statistics for 2024:
- Over 10 billion emojis are used every day around the world.
- 44% of customers are more likely to buy something if it’s advertised with emojis.
- The most used emoji on X is Face With Tears of Joy.
- 86% of emoji users on X are 24 or younger.
- Only 7% of people use the peach emoji as a fruit; the rest use it for non-fruit meanings.
- The nail polish emoji is considered the most misunderstood emoji in 2024 based on a survey.
HOW TO SEND LARGE VIDEOS OVER EMAIL ON YOUR PHONE
Kurt’s key takeaways
Adding emojis to your text messages and emails is a fun way to lighten up the conversation and make it a little more relatable, depending on who you’re talking to. Have fun with them.
Do you use emojis when you text or send an email? Why or why not? Let us know by writing us at Cyberguy.com/Contact.
For more of my tech tips and security alerts, subscribe to my free CyberGuy Report Newsletter by heading to Cyberguy.com/Newsletter.
Ask Kurt a question or let us know what stories you’d like us to cover.
Follow Kurt on his social channels:
Answers to the most asked CyberGuy questions:
Copyright 2024 CyberGuy.com. All rights reserved.
/cdn.vox-cdn.com/uploads/chorus_asset/file/24774110/STK156_Instagram_threads_1.jpg)
The Threads API is now available, meeting a promised launch by the end of June. The free API will allow developers to build “unique integrations” into Threads, and potentially even result in third-party apps for Meta’s competitor to what was previously known as Twitter.
“People can now publish posts via the API, fetch their own content, and leverage our reply management capabilities to set reply and quote controls, retrieve replies to their posts, hide, unhide or respond to specific replies,” explains Jesse Chen, director of engineering at Threads.
Chen says that insights into Threads posts are “one of our top requested features for the API,” so Meta is allowing developers to see the number of views, likes, replies, reposts, and quotes on Threads posts through the API. Meta has published plenty of documentation about how developers can get started with the Threads API, and there’s even an open-source Threads API sample app on GitHub.
Meta has been testing the Threads API with a small number of developers: Grabyo, Hootsuite, Social News Desk, Sprinklr, Sprout Social, and Techmeme. These test integrations have allowed sites like Techmeme to automate posting to Threads, or Sprout and Hootsuite customers to feed Threads posts into the social media management platform.
We’re now waiting to see if developers will be able to easily build a third-party Threads app with this new API that’s not connected to a social media management platform. The existing fediverse beta could help with that, allowing Threads users to access posts through Mastodon clients and share content to Mastodon servers. The current beta of the fediverse integration doesn’t let users view replies and follows from the fediverse though, so it’s far from being feature complete as an alternative to third-party Threads apps.
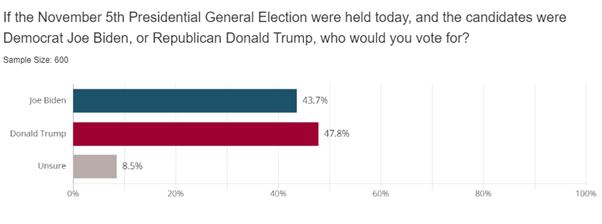
Poll: Lawfare backfiring on Biden in North Carolina, Trump stays strong

Bighorn Sheep Continue To Thrive in North Dakota

Ohio State’s Juneteenth event celebrates community connections

Challenge Revived to Oklahoma Transgender Birth Certificate Ban

Oregon Football QB Commit Akili Smith Jr. Ready to Compete at Elite 11 Finals: ‘Win The Whole Thing!’

See it: Tesla crashes into Columbus convention center at 70 mph

Colorado Rockies game no. 116 thread: Zac Gallen vs José Ureña

Fox News Politics: Georgia the whole day through

Death of missing Oregon girl found in stream ruled homicide

At least 2 dead as tornadoes hit Alabama, damage homes across Southeast

Netanyahu urges Biden admin to renew weapons supply to Israel, says it’s ‘inconceivable’ US withheld aid

Austrian group finalises 25-million-euro giveaway of heiress’s money

Opinion: Extreme heat kills. What the US can do to protect the most vulnerable | CNN

Trump targets House Freedom Caucus chair in intra-party Republican primary feud

Concentration camp museum director joins campaign to ban AfD
-
 Movie Reviews1 week ago
‘Darkest Miriam’ Review: Britt Lower in a Marvel of a Drama About a Young Librarian’s Loves and Fears
-
 Politics1 week ago
Gun group vows to 'defend' Trump's concealed carry license after conviction
-
 Politics1 week ago
Should Trump have confidence in his lawyers? Legal experts weigh in
-
 Politics1 week ago
GOP releases Jan. 6 clip of Pelosi saying 'I take responsibility' as she discussed National Guard absence
-
 World1 week ago
Orban party loses major support in Hungary's EU election
-
 World1 week ago
Ukraine reconstruction official quits citing ‘systemic obstacles’
-
World1 week ago
German chancellor Olaf Scholz heckled by pro-Palestinian protesters at SPD rally
-
 World1 week ago
Jury deliberations start in Hunter Biden’s gun trial