Fitness
Heart rate zones on Apple Watch and iPhone – 9to5Mac

A handy health and fitness feature with watchOS and iOS is the ability to see your heart rate zones on Apple Watch and iPhone. Read on for what they mean, how to see your max heart rate, manually edit your zones, and more.
Apple Watch and iPhone – with watchOS 9/iOS 16 and later – automatically create your five heart rate zones based on the Heart Rate Reserve method. Max and resting values are updated automatically on the first day of each month.
Here’s how Apple describes the feature:
“Heart Rate Zones are a percentage of your maximum heart rate and are automatically calculated and personalized using your health data. On Apple Watch, Heart Rate Zones are presented in five segments—effort levels from light to increasingly harder. By monitoring your Heart Rate Zone, you can make your workout more efficient and challenge yourself to improve your fitness.”
How to see heart rate zones on Apple Watch and iPhone
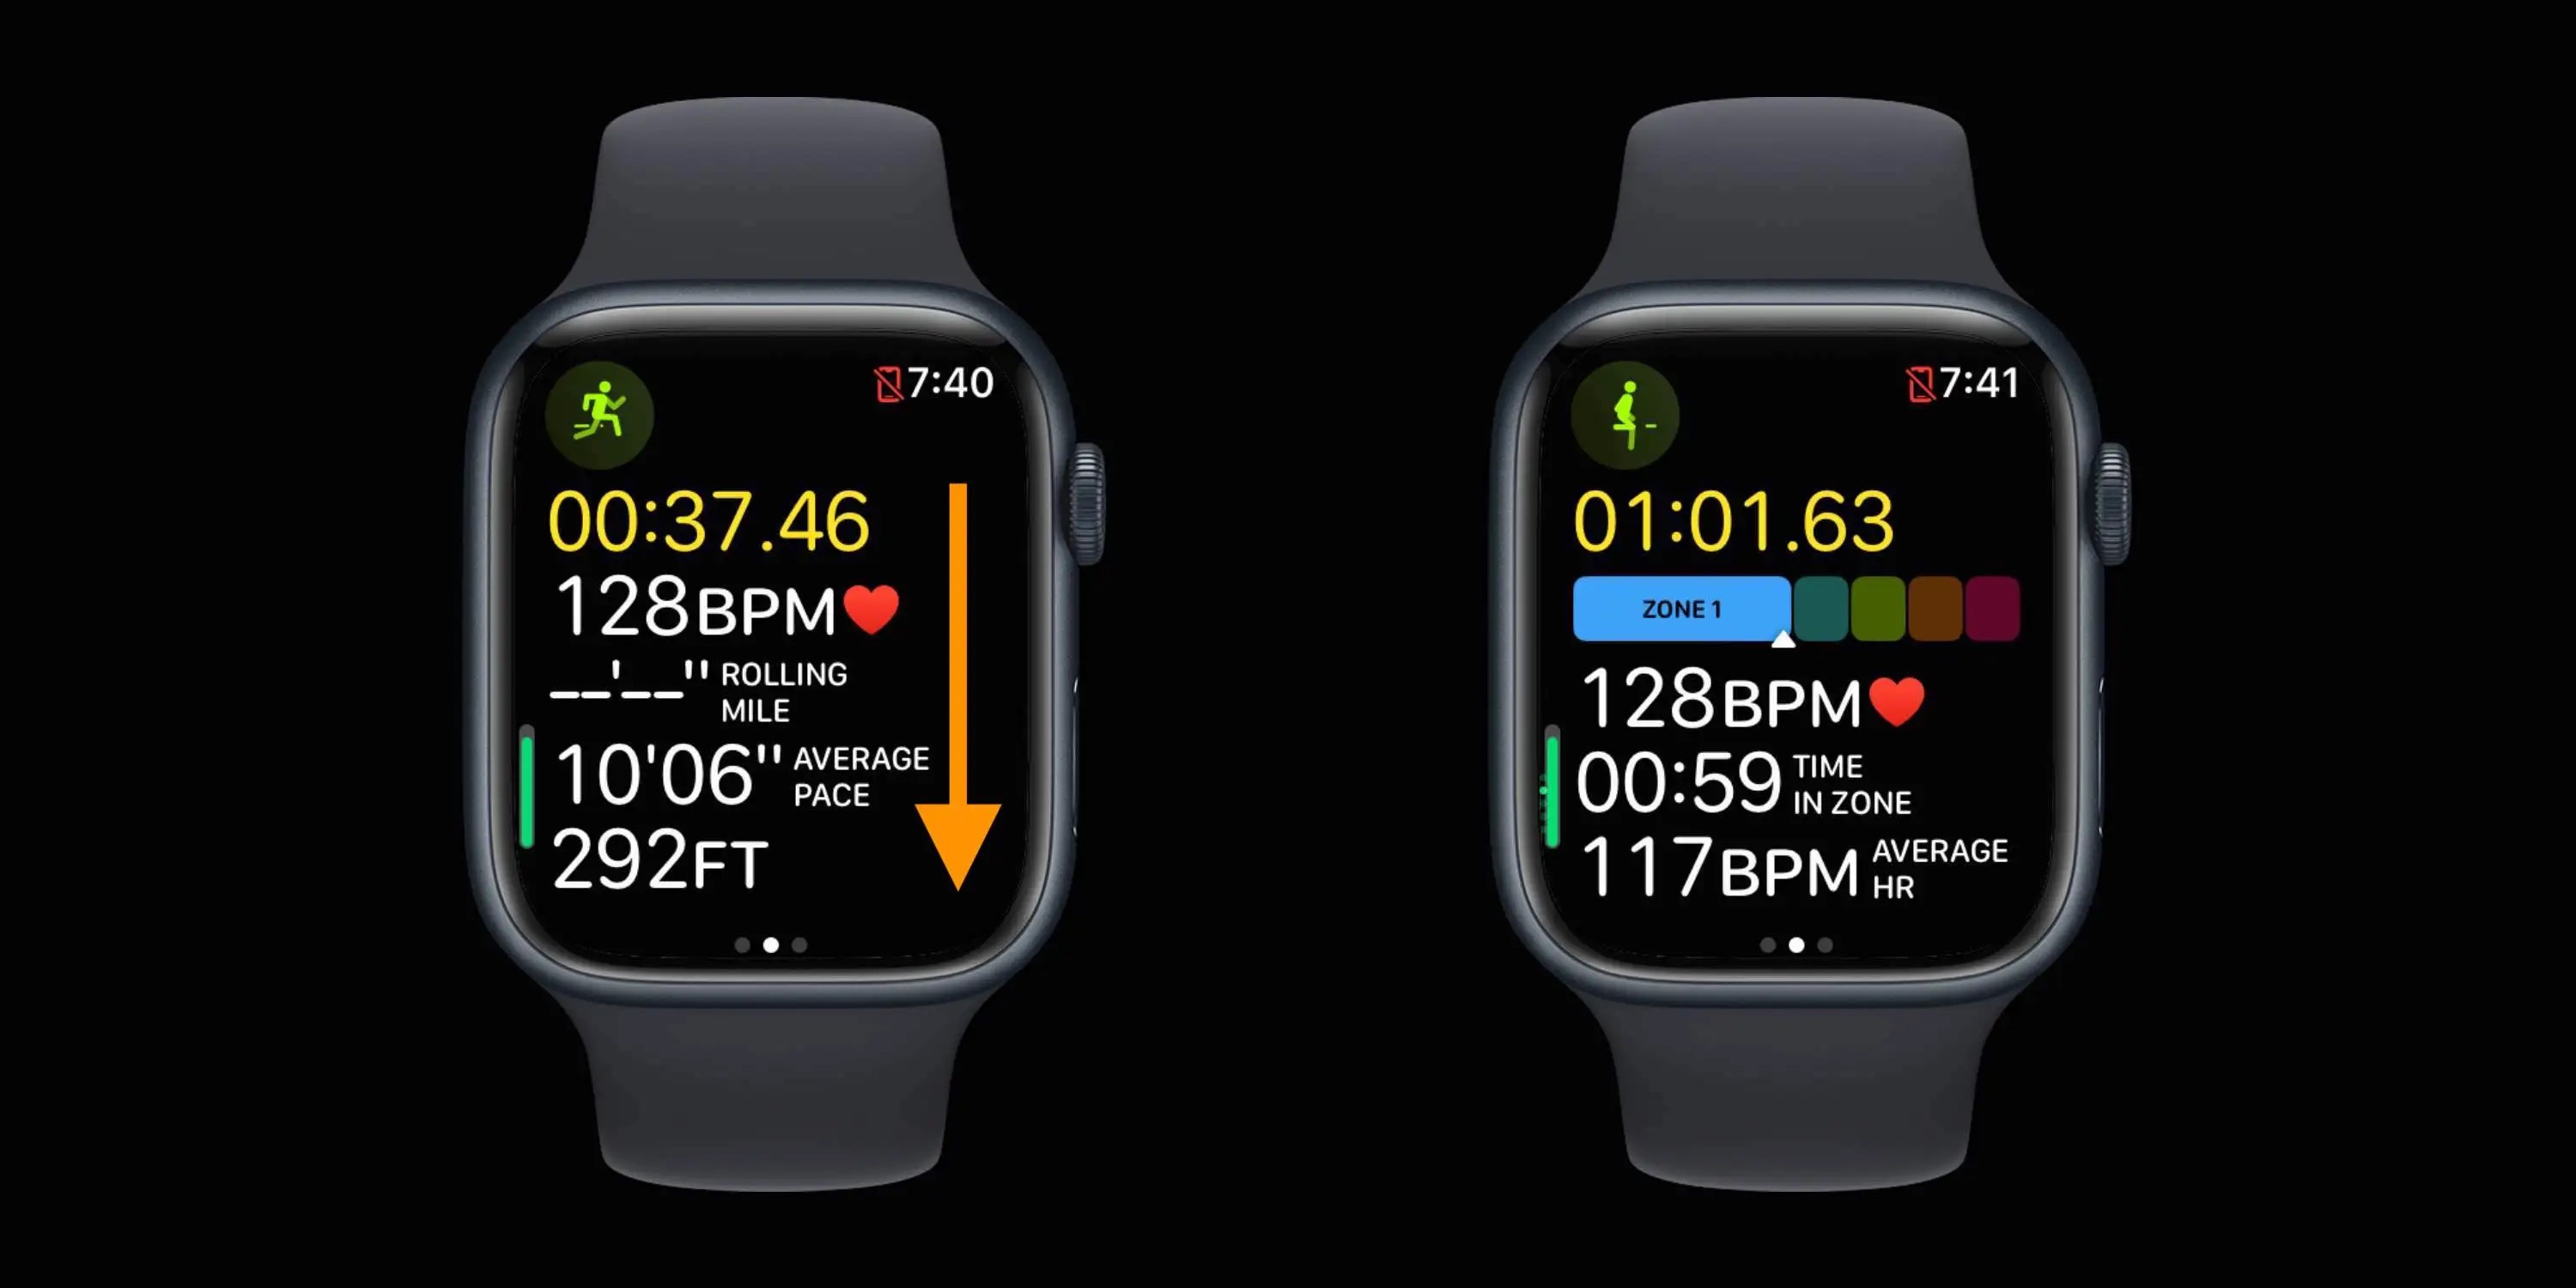
See heart rate zones during a workout
- Make sure you’re running watchOS 9 or later on Apple Watch and also have your birthdate entered in the Health app on iPhone
- Start a cardio-focused workout like a walk, run, or cycling (Apple hasn’t shared exactly which workout types include heart rate zones except for “cardio-focused” ones)
- Swipe down on the first Workout screen to see your heart rate and which zone it’s in
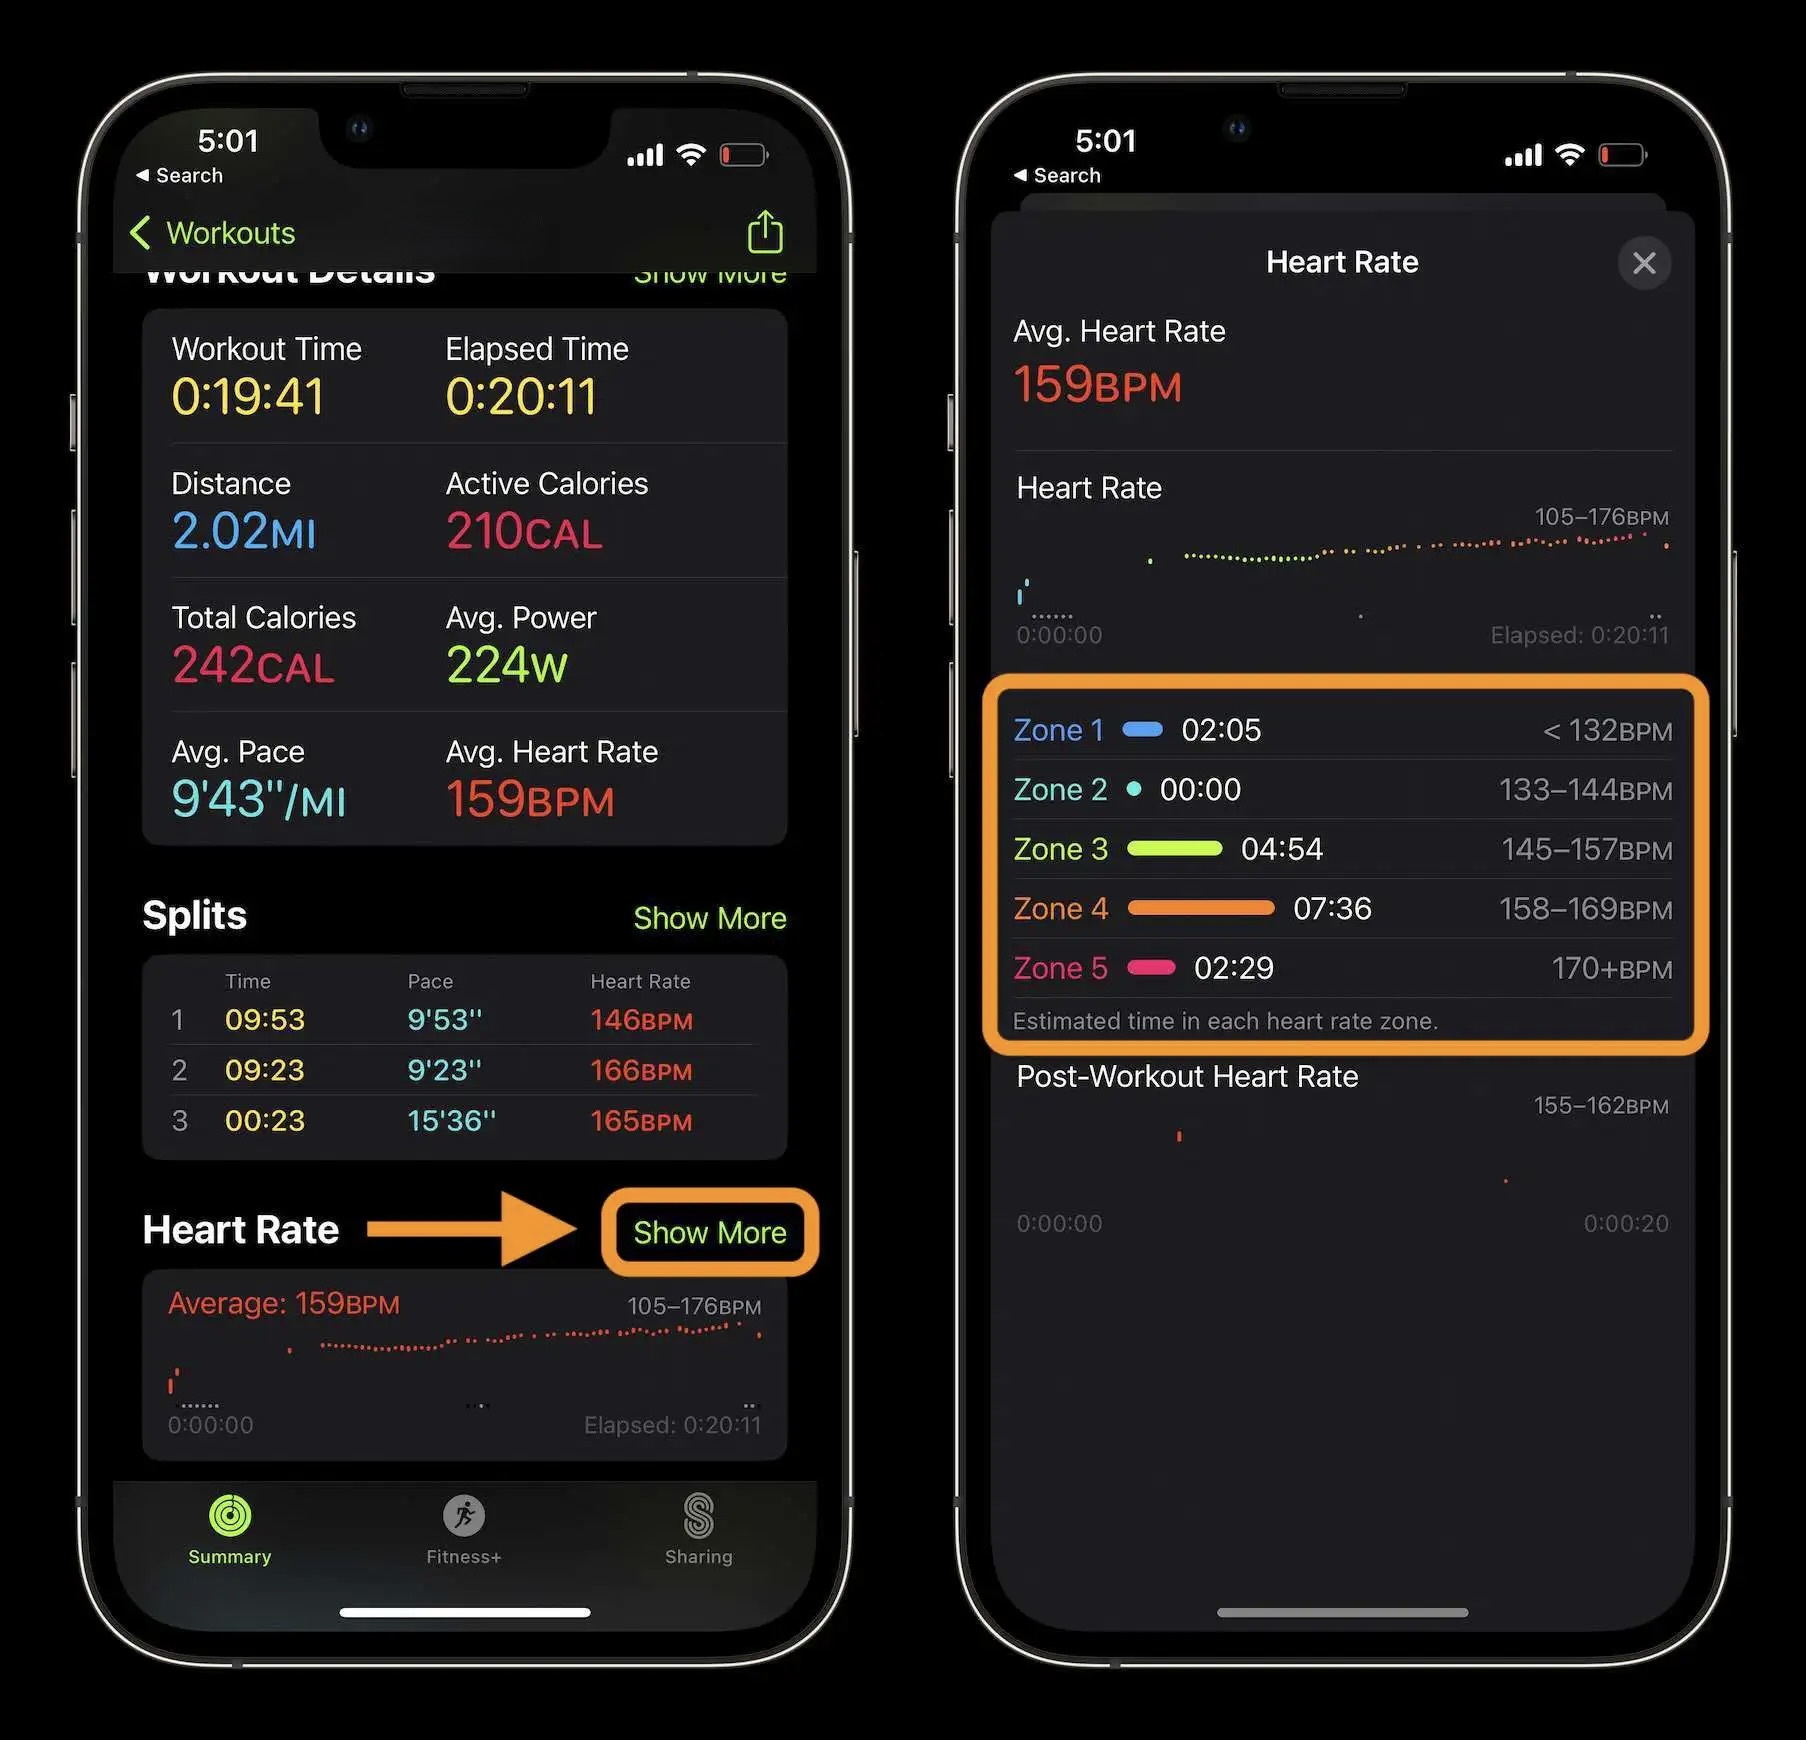
See heart rate zones after a workout
- After a workout, head to the Fitness app on iPhone to see heart rate zone data
- Choose a workout from the main Summary screen or tap the rings or Show More to pick a different date/workout
- Once you’ve picked a workout, swipe down until you see Heart Rate, tap Show More
Now you’ll see the breakdown of how much time you spent in each heart rate zone:
How to manually edit your heart rate zones
While the heart rate zones are automatically added based on your age, height, and weight, you can manually change them (usually for advanced athletes).
- Head to Settings > Workout > Heart Rate Zones on your Apple Watch and choose Manual at the top
- Or on iPhone go to the Apple Watch app > Workout > Heart Rate Zones then choose Manual at the top
How to see your max heart rate?
Going beyond your max heart rate is considered unsafe by medical professionals. To see your recommended maximum:
- Head to Settings > Workout > Heart Rate Zones on your Apple Watch, swipe down to find your max heart rate
- Or on iPhone go to the Apple Watch app > Workout > Heart Rate Zones, swipe down to find your max heart rate
What do heart rate zones mean?
Understanding your heart rate zones can be useful in a variety of ways. But some of the most practical applications are using heart rate training (properly rest or push yourself), targeting fat-burning or carb-burning heart rate zones, and awareness for those who have health conditions.
The Cleveland Clinic has a helpful article on understanding what kind of calories you’re burning in different zones. This won’t map directly to the five heart rate zones with Apple Watch, but is a good starting point.
Use your max heart rate (details on finding above) to figure out the numbers from the below calculations:
- Lower-intensity zone: You’re exercising at 50% to 60% of your max heart rate. At this point, 85% of the calories you burn are fat. The downside? You’re burning fewer calories overall than you would if you were exercising at a higher intensity. You’re generally able to sustain this zone the longest amount of time.
- Temperate zone: You’re exercising at 60% to 70% of your max heart rate. Roughly 65% of the calories you burn are fat.
- Aerobic zone: Working at 70% to 80% of your max heart rate puts you in the aerobic zone. About 45% of the calories you burn are fat. But you’re burning a higher number of overall calories compared to the other heart rate zones. You generally sustain this zone the shortest amount of time.
For heart rate training, the big idea is to “train your aerobic system without overstressing your skeletal and muscular systems, explains personal trainer Erin Carr.” Check out this article from Runner’s World for all the fine details:
Read more 9to5Mac tutorials:
FTC: We use income earning auto affiliate links. More.

There’s more to your core than you might realize. There are the muscles that make up the visible topmost layer of abs — the ones responsible for the chiseled six-pack — and then there are the deep core muscles.
Among these deep core muscles is the transversus abdominis, the deepest layer of the abdominals. Think of them like a corset that wraps around your entire midsection, explains personal trainer, TODAY.com health editor and Start TODAY producer Brianna Steinhilber.
The muscles of the transversus abdominis control your posture and the way you move, TODAY.com previously reported. They act as the foundation for the rest of your abdominal muscles, supporting mobility and functional strength across the entire body. For that reason, they deserve as much attention as the superficial ab muscles that tend to get all the glory.
“Working these deep core muscles is really what’s going to help you lose inches off your waist, build core strength and stability, and even reduce lower back pain,” says Steinhilber. Improve your strength and stability with the one deep core move that stands out above the rest.
Fitness Tip of the Day: Perfect Your Pelvic Tilt for a Strong Deep Core
While there are many exercises that target the transversus abdominis, the “pelvic tilt is definitely the most important thing to master before doing any other ab exercise or, arguably, any exercise,” says Steinhilber.
Why It Matters
On its own, the pelvic tilt strengthens the innermost ab muscles, but it also acts as the foundation for every other workout you do.
“It’s a position that should become second nature,” says Steinhilber, because it stabilizes and braces your core whether you’re doing an abs circuit, Pilates or strength training.
By activating and engaging your deep core muscle with a pelvic tilt, you’ll be recruiting these innermost ab muscles to protect your back, prevent injury and support your posture with every move you do, TODAY.com previously reported.
How To Get Started
Start by lying on your back with your knees bent and your feet hip-width apart, TODAY.com previously reported. Place your arms at your side and point them toward your heels. Inhale, then, as you exhale, “think about pulling your belly button to your spine and tucking the tailbone under,” says Steinhilber.
It can help initially to exaggerate the movement by rounding your lower back so that it touches the ground as your tailbone remains in place. Then, tilt your pelvis toward your ribs. Repeat these pelvic tilts forward and back 10 times.
When performing other exercises, whether or not they require you to lie on your back, maintain the pelvic tilt position to ward off injury and make the workout more effective, TODAY.com previously reported.
TODAY’s Expert Tip of the Day series is all about simple strategies to make life a little easier. Every Monday through Friday, different qualified experts share their best advice on diet, fitness, heart health, mental wellness and more.

Everyone knows the importance of staying active as you age, with those who exercise more likely to improve their longevity by staying fitter and healthier. But new research suggests exercise variety counts for a lot, too.
It might be time to add a bit more spice to your activity mix.
The Study
The study, published in BMJ Medicine, tracked the weekly exercise habits of 110,000 people – 70,000 men and 40,000 women – over the course of 30 years. Researchers wanted to determine whether there was an association between variation in physical activity and risk of death.
Participants reported how much time per week they spent doing activities such as walking, running, cycling, swimming, rowing, strength training, playing sports, lower-intensity exercises like yoga, outdoor work such as gardening or chopping wood, and even climbing the stairs. Researchers then scored participants according to the variety of physical activity they undertook, which was only measured if it was something they engaged in consistently – playing badminton just once a year doesn’t quite count here.
The Results
Those who engaged in the greatest variety of exercise had a 19% lower risk of all-cause mortality than those who engaged in the least variety. The relationship also held true at every level of physical activity – for example, someone who took part in four different activities had a lower mortality risk than someone who completed only three.
Researchers also highlighted that people who resistance trained for 120 minutes or more per week saw their mortality risk plateau, regardless of exercise variety.
What Does This Mean for You?
It’s all about variety. The research suggests taking part in a wide range of activities is better for you than doing the same amount of exercise in just one discipline, so start mixing things up and reap the benefits. Rather than being extremely regimented week to week and sticking to the same one or two activities, this approach gives you greater freedom to try new things, safe in the knowledge that doing so may be better for your overall health. But don’t go all guns blazing just yet.
‘For people who are less active, the key message is that small amounts can still matter,’ the researchers say. ‘Building a routine gradually may be more important than trying to do a lot at once.’
It’s also fair to assume that combining strength training with cardiovascular exercise, such as running or hiking, will help optimise those benefits even further. Both are associated with greater longevity, so pairing them together is likely to help keep you fitter and healthier for longer.
That said, total exercise volume is still king when it comes to longevity – five hours of strength training beats four hours split between swimming, running and cycling, for example. The NHS recommends that adults over 65 do at least 150 minutes of moderate-intensity activity, or 75 minutes of vigorous-intensity activity, each week to improve health and reduce the risk of heart disease and stroke.
The main message? Lift some weights, get outside as much as you can, and keep your heart pumping with a bit of intensity each week – it’ll help you stay in rude health.
If there’s one thing Kori Sampson knows, it’s how to optimise your body composition for performance. To tap into his knowledge as an elite athlete and coach, we asked him to create a 4-week plan to help you move faster, recover quicker and keep pushing when the fatigue sets in – all while improving your muscle-to-fat ratio.
Ready to build muscle, burn fat and come out the other side looking, feeling and performing better? Click here to get 14 days of free access to the plan via the Men’s Health app.

Ryan is a Senior Writer at Men’s Health UK with a passion for storytelling, health and fitness. Having graduated from Cardiff University in 2020, and later obtaining his NCTJ qualification, Ryan started his career as a Trainee News Writer for sports titles Golf Monthly, Cycling Weekly and Rugby World before progressing to Staff Writer and subsequently Senior Writer with football magazine FourFourTwo.
During his two-and-a-half years there he wrote news stories for the website and features for the magazine, while he also interviewed names such as Les Ferdinand, Ally McCoist, Jamie Redknapp and Antonio Rudiger, among many others. His standout memory, though, came when getting the opportunity to speak to then-Plymouth Argyle manager Steven Schumacher as the club won League One in 2023.
Having grown up a keen footballer and playing for his boyhood side until the age of 16, Ryan got the opportunity to represent Northern Ireland national futsal team eight times, scoring three goals against England, Scotland and Gibraltar. Now past his peak, Ryan prefers to mix weightlifting with running – he achieved a marathon PB of 3:31:49 at Manchester in April 2025, but credits the heat for failing to get below the coveted 3:30 mark…
You can follow Ryan on Instagram or on X

No matter your age, walking is one of the best exercises you can do for your body. Still, the same-old stroll every day can start to feel boring. By incorporating some creative walking exercises to build muscle into your session, you can bust boredom as well as maximize the benefits of your walk.
“Any repetitive motion in one plane of motion, such as walking forward, will activate the same muscles each time,” said Amy West, M.D., a sports medicine physician at Northwell Health in New York. While the muscles you use to walk forward (like the quads, hamstrings, glutes, and calves) are certainly smart to strengthen, there are other muscles in the lower body and core that are important to keep strong as you age. “Our muscles support our joints, so by improving muscle strength you can help reduce impact on your joints,” Dr. West said. “When you use different walking methods, different muscles are activated each time, which promotes balanced muscle development and postural alignment—and could potentially prevent future aches and pains.”
Meet the experts: Amy West, M.D., a sports medicine physician at Northwell Health in New York; Lindsey Benoit O’Connell, C.S.C.S., a certified trainer, a meditation teacher, and the founder of The LAB Wellness; Janet S. Dufek, Ph.D., a professor in the department of kinesiology and nutrition sciences at the University of Nevada, Las Vegas; Samantha Pinkston, P.T., D.P.T., a senior physical therapist at Montefiore Medical Center in New York City; Latreal Mitchell, a personal trainer and health coach.
Lindsey Benoit O’Connell, C.S.C.S., a certified trainer, a meditation teacher, and the founder of The LAB Wellness, agreed: “Different walking styles can help improve balance, coordination, and agility,” she said. Aside from building strength throughout your body, using different walking styles “challenges your brain to work harder to coordinate the steps,” O’Connell added. Then, once you can confidently do all of these, you can add high-intensity intervals or extra resistance. “Mix up your walks during the week by doing different styles on different days,” O’Connell suggested. “Over time, you’ll see big payoffs!”
Read on for fitness experts’ favorite walking variations, plus how each can help you get stronger and improve mobility and balance as you age.
How to walk to build muscle
Backward Walking
Physical therapists often incorporate backward walking (also called “retro walking”) into treatment plans for various leg injuries and stroke rehabilitation because it helps improve balance, coordination, and range of motion in the hips, leading to better mobility and stability, said backward-walking researcher Janet S. Dufek, Ph.D., a professor in the department of kinesiology and nutrition sciences at the University of Nevada, Las Vegas. Walking backward may also help you maintain a healthy weight (varying the exercises you do helps prevent you from plateauing) and reduce your levels of C-reactive protein, a marker of chronic inflammation, based on a study in which overweight individuals walked backward on a treadmill four times a week.
Muscles Worked:
Try It: Simply take steps backward instead of forward. Because you won’t be able to see where you’re going, it’s smart to do this in a safe, controlled environment—ideally on a treadmill at a slow speed so you can use the rails for balance if necessary. If you don’t have access to a treadmill, then your driveway, a flat and even area of sidewalk, or your local track should work. If you’re not walking on a treadmill, Dufek suggested recruiting a partner—they can be your eyes, and you can hold hands with them for additional support while you master this skill. Start with short bouts so your muscles can get used to the new way of moving (and don’t be surprised if they feel fatigued faster than with regular walking): “Begin with 30-second intervals and gradually extend them as you gain confidence and endurance,” O’Connell advised.
Criss-Cross Walking
Ever watch a clip of supermodels strutting along the runway? They lift one foot, cross it in front of the other to take a step, and continue that pattern. This is essentially how you walk criss-cross style. Walking in this manner strengthens muscles that can help you maintain good coordination, hip mobility, and balance, leading to better overall mobility and less risk of injury, said Samantha Pinkston, P.T., D.P.T., a senior physical therapist at Montefiore Medical Center in New York City.
Muscles Worked:
- Hip adductors (in your inner thigh region)
- Hip abductors (in your buttocks)
- Quads
- Calves
Try It: Start by standing with your feet hip-width apart. Lift your right foot and cross it diagonally in front of your left before lowering it to the ground. Then lift your left foot, kick out your knee, and cross it diagonally in front of your right foot in the same way. Think of it as if you’re making an “X” as you stride. Tighten your buttock muscles and breathe to engage your core. “Practice on flat surfaces and avoid overexaggerating your steps to maintain your balance,” suggested O’Connell.
Nanba Walking
You may not have heard of Nanba walking, but you’ve probably seen it in movies featuring samurai warriors who walk by moving the same arm and leg in sync—a more stilted, less fluid stride than traditional walking. Old research from Singapore has found that this style of walking, which originated in Japan, is more stable and energy-efficient than traditional walking, partly because it involves less twisting of the body and promotes greater integration between the upper body and the lower body. It can also promote mindfulness because it causes you to really focus on your movements, said Latreal Mitchell, a personal trainer and health coach.
Muscles Worked:
Try It: Stand with your feet hip-width apart and your arms hanging loosely by your sides. Bend your knees slightly, as if you were holding a mini squat. Try to stay in this position as you move, as “it’s key for engaging the glutes and keeping the focus there so you don’t end up relying on bigger muscles in your legs to do all the work,” said O’Connell. Step forward with your right leg, moving your right arm forward with it; then step forward with your left leg and bring your left arm forward. Focus on your posture, engaging your core and maintaining an open chest, Mitchell advised. “It’s going to feel awkward at first,” O’Connell said, so practice slowly, and then ramp up. This is a great movement to incorporate into a warm-up before or a cooldown following your usual walking workout.
Side-Stepping
Also known as lateral walking, it’s when you walk sideways with relatively small steps, similarly to how a crab scuttles across the sand. You can boost the effort by placing a resistance band around your calves or thighs once you’ve gotten the form down. Side-stepping improves balance, flexibility, and pelvic stability, which can help prevent falls and injuries that could interrupt your lifestyle and walking routine.
Muscles Worked:
- Hips
- Inner thigh muscles
- Lower leg muscles
- Core
- Glutes
Try It: Stand up straight with your feet nearly touching, knees slightly bent, and your chest lifted. Keeping your feet facing forward, step to the side with your right foot and quickly bring the left one to meet it. Continue this pattern, taking 10 steps to the right and pausing, then taking 10 steps to the left. “Keep the steps small to maintain control,” O’Connell suggested. When you’re ready to add a resistance band, position it around your ankles or right above your knees and then perform the steps above. Having the band around your ankles works your lower leg muscles more, whereas placing it above your knees makes your glutes and hips work harder.
Skipping
Conjure your inner child and spend some time skipping. “It provides cardiovascular benefits and is good for bone density,” Mitchell said. “It’s like a gentler form of running.” In fact, East Carolina University researchers found that skipping was lower-impact and reduced the load on the joints compared with running. “Skipping also involves coordination and balance—very important as we age,” Dr. West noted.
Muscles Worked:
- Quads
- Glutes
- Core—plus, cardio!
Try It: Start by standing with your feet hip-width apart. Step forward and hop on your right foot as you lift your left foot off the ground, then step forward and hop on your left foot as you lift your right foot. Continue the pattern from there. During a regular forward walk, you can try incorporating 15-second bursts of skipping every block or two, O’Connell said. As you get stronger and more comfortable, you can lengthen your skipping stride to increase the challenge—and the benefits.
-

 Hawaii7 minutes ago
Man accused of trying to run over police officers in Kalihi arrested
-

 Idaho10 minutes ago
Fire burning near Ammon foothills – East Idaho News
-
 Illinois15 minutes ago
Illinois Launches Holiday DUI Crackdown
-

 Indiana22 minutes ago
Storm chance late on the Fourth, then heat tones down early next week | July 4, 2026
-

 Iowa25 minutes ago
Storm puts a pause to Savannah Bananas game at Kinnick Stadium
-
 Kansas30 minutes ago
Colombia fans in Kansas City celebrated victory Friday over Ghana in the Round of 32 World Cup match
-

 Kentucky37 minutes ago
Kentucky Democratic Senate candidate says voters deserve ‘honest answer’ about McConnell’s health
-

 Louisiana37 minutes ago
Louisiana Supreme Court recalls Liz Murrill’s arrest warrant in late-night emergency ruling