Technology
How to Run Your Own ChatGPT-Like LLM for Free (and in Private)
")
The power of large language models (LLMs) such as ChatGPT, generally made possible by cloud computing, is obvious, but have you ever thought about running an AI chatbot on your own laptop or desktop? Depending on how modern your system is, you can likely run LLMs on your own hardware. But why would you want to?
Well, maybe you want to fine-tune a tool for your own data. Perhaps you want to keep your AI conversations private and offline. You may just want to see what AI models can do without the companies running cloud servers shutting down any conversation topics they deem unacceptable. With a ChatGPT-like LLM on your own hardware, all of these scenarios are possible.
And hardware is less of a hurdle than you might think. The latest LLMs are optimized to work with Nvidia graphics cards and with Macs using Apple M-series processors—even low-powered Raspberry Pi systems. And as new AI-focused hardware comes to market, like the integrated NPU of Intel’s “Meteor Lake” processors or AMD’s Ryzen AI, locally run chatbots will be more accessible than ever before.
Thanks to platforms like Hugging Face and communities like Reddit’s LocalLlaMA, the software models behind sensational tools like ChatGPT now have open-source equivalents—in fact, more than 200,000 different models are available at this writing. Plus, thanks to tools like Oobabooga’s Text Generation WebUI, you can access them in your browser using clean, simple interfaces similar to ChatGPT, Bing Chat, and Google Bard.
The software models behind sensational tools like ChatGPT now have open-source equivalents—in fact, more than 200,000 different models are available.
So, in short: Locally run AI tools are freely available, and anyone can use them. However, none of them is ready-made for non-technical users, and the category is new enough that you won’t find many easy-to-digest guides or instructions on how to download and run your own LLM. It’s also important to remember that a local LLM won’t be nearly as fast as a cloud-server platform because its resources are limited to your system alone.
Nevertheless, we’re here to help the curious with a step-by-step guide to setting up your own ChatGPT alternative on your own PC. Our guide uses a Windows machine, but the tools listed here are generally available for Mac and Linux systems as well, though some extra steps may be involved when using different operating systems.
Some Warnings About Running LLMs Locally
First, however, a few caveats—scratch that, a lot of caveats. As we said, these models are free, made available by the open-source community. They rely on a lot of other software, which is usually also free and open-source. That means everything is maintained by a hodgepodge of solo programmers and teams of volunteers, along with a few massive companies like Facebook and Microsoft. The point is that you’ll encounter a lot of moving parts, and if this is your first time working with open-source software, don’t expect it to be as simple as downloading an app on your phone. Instead, it’s more like installing a bunch of software before you can even think about downloading the final app you want—which then still may not work. And no matter how thorough and user-friendly we try to make this guide, you may run into obstacles that we can’t address in a single article.
Also, finding answers can be a real pain. The online communities devoted to these topics are usually helpful in solving problems. Often, someone’s solved the problem you’re encountering in a conversation you can find online with a little searching. But where is that conversation? It might be on Reddit, in an FAQ, on a GitHub page, in a user forum on HuggingFace, or somewhere else entirely.
AI is quicksand. Everything moves whip-fast, and the environment undergoes massive shifts on a constant basis.
It’s worth repeating that open-source AI is moving fast. Every day new models are released, and the tools used to interact with them change almost as often, as do the underlying training methods and data, and all the software undergirding that. As a topic to write about or to dive into, AI is quicksand. Everything moves whip-fast, and the environment undergoes massive shifts on a constant basis. So much of the software discussed here may not last long before newer and better LLMs and clients are released.
Bottom line: Proceed at your own risk. There’s no Geek Squad to call for help with open-source software; it’s not all professionally maintained; and you’ll find no handy manual to read or customer service department to turn to—just a bunch of loosely organized online communities.
Finally, once you get it all running, these AI models have varying degrees of polish, but they all carry the same warnings: Don’t trust what they say at face value, because it’s often wrong. Never look to an AI chatbot to help make your health or financial decisions. The same goes for writing your school essays or your website articles. Also, if the AI says something offensive, try not to take it personally. It’s not a person passing judgment or spewing questionable opinions; it’s a statistical word generator made to spit out mostly legible sentences. If any of this sounds too scary or tedious, this may not be a project for you.
Select Your Hardware
Before you begin, you’ll need to know a few things about the machine on which you want to run an LLM. Is it a Windows PC, a Mac, or a Linux box? This guide, again, will focus on Windows, but most of the resources referenced offer additional options and instructions for other operating systems.
You also need to know whether your system has a discrete GPU or relies on its CPU’s integrated graphics. Plenty of open-source LLMs can run solely on your CPU and system memory, but most are made to leverage the processing power of a dedicated graphics chip and its extra video RAM. Gaming laptops, desktops, and workstations are better suited to these applications, since they have the powerful graphics hardware these models often rely on.

Gaming laptops and mobile workstations offer the best hardware for running LLMs at home. (Credit: Molly Flores)
In our case, we’re using a Lenovo Legion Pro 7i Gen 8 gaming notebook, which combines a potent Intel Core i9-13900HX CPU, 32GB of system RAM, and a powerful Nvidia GeForce RTX 4080 mobile GPU with 12GB of dedicated VRAM.
If you’re on a Mac or Linux system, are CPU-dependent, or are using AMD instead of Intel hardware, be aware that while the general steps in this guide are correct, you may need extra steps and additional or different software to install. And the performance you see could be markedly different from what we discuss here.
Set Up Your Environment and Required Dependencies
To start, you must download some necessary software: Microsoft Visual Studio 2019. Any updated version of Visual Studio 2019 will work (though not newer annualized releases), but we recommend getting the latest version directly from Microsoft.

(Credit: Brian Westover/Microsoft)
Personal users will be fine to skip the Enterprise and Professional versions and use just the BuildTools version of the software.

Find the latest version of Visual Studio 2019 and download the BuildTools version (Credit: Brian Westover/Microsoft)
After choosing that, be sure to select “Desktop Development with C++.” This step is essential in order for other pieces of software to work properly.

Be sure to select “Desktop development with C++.” (Credit: Brian Westover/Microsoft)
Begin your download and kick back: Depending on your internet connection, it could take several minutes before the software is ready to launch.

(Credit: Brian Westover/Microsoft)
Download Oobabooga’s Text Generation WebUI Installer
Next, you need to download the Text Generation WebUI tool from Oobabooga. (Yes, it’s a silly name, but the GitHub project makes an easy-to-install and easy-to-use interface for AI stuff, so don’t get hung up on the moniker.)

(Credit: Brian Westover/Oobabooga)
To download the tool, you can either navigate through the GitHub page or go directly to the collection of one-click installers Oobabooga has made available. We’ve installed the Windows version, but this is also where you’ll find installers for Linux and macOS. Download the zip file shown below.

(Credit: Brian Westover/Oobabooga)
Create a new file folder someplace on your PC that you’ll remember and name it AI_Tools or something similar. Do not use any spaces in the folder name, since that will mess up some of the automated download and install processes of the installer.

(Credit: Brian Westover/Microsoft)
Then, extract the contents of the zip file you just downloaded into your new AI_Tools folder.
Run the Text Generation WebUI Installer
Once the zip file has been extracted to your new folder, look through the contents. You should see several files, including one called start_windows.bat. Double-click it to begin installation.
Depending on your system settings, you might get a warning about Windows Defender or another security tool blocking this action, because it’s not from a recognized software vendor. (We haven’t experienced or seen anything reported online to indicate that there’s any problem with these files, but we’ll repeat that you do this at your own risk.) If you wish to proceed, select “More info” to confirm whether you want to run start_windows.bat. Click “Run Anyway” to continue the installation.

(Credit: Brian Westover/Microsoft)
Now, the installer will open up a command prompt (CMD) and begin installing the dozens of software pieces necessary to run the Text Generation WebUI tool. If you’re unfamiliar with the command-line interface, just sit back and watch.

(Credit: Brian Westover/Microsoft)
First, you’ll see a lot of text scroll by, followed by simple progress bars made up of hashtag or pound symbols, and then a text prompt will appear. It will ask you what your GPU is, giving you a chance to indicate whether you’re using Nvidia, AMD, or Apple M series silicon or just a CPU alone. You should already have figured this out before downloading anything. In our case, we select A, because our laptop has an Nvidia GPU.

(Credit: Brian Westover/Microsoft)
Once you’ve answered the question, the installer will handle the rest. You’ll see plenty of text scroll by, followed first by simple text progress bars and then by more graphically pleasing pink and green progress bars as the installer downloads and sets up everything it needs.

(Credit: Brian Westover/Microsoft)
At the end of this process (which may take up to an hour), you’ll be greeted by a warning message surrounded by asterisks. This warning will tell you that you haven’t downloaded any large language model yet. That’s good news! It means that Text Generation WebUI is just about done installing.

(Credit: Brian Westover/Microsoft)
At this point you’ll see some text in green that reads “Info: Loading the extension gallery.” Your installation is complete, but don’t close the command window yet.

(Credit: Brian Westover/Microsoft)
Copy and Paste the Local Address for WebUI
Immediately below the green text, you’ll see another line that says “Running on local URL: http://127.0.01:7860.” Just click that URL text, and it will open your web browser, serving up the Text Generation WebUI—your interface for all things LLM.

(Credit: Brian Westover/Microsoft)
You can save this URL somewhere or bookmark it in your browser. Even though Text Generation WebUI is accessed through your browser, it runs locally, so it’ll work even if your Wi-Fi is turned off. Everything in this web interface is local, and the data generated should be private to you and your machine.

(Credit: Brian Westover/Oobabooga)
Close and Reopen WebUI
Once you’ve successfully accessed the WebUI to confirm it’s installed correctly, go ahead and close both the browser and your command window.
In your AI_Tools folder, open up the same start_windows batch file that we ran to install everything. It will reopen the CMD window but, instead of going through that whole installation process, will load up a small bit of text including the green text from before telling you that the extension gallery is loaded. That means the WebUI is ready to open again in your browser.
(Credit: Brian Westover/Oobabooga)
Use the same local URL you copied or bookmarked earlier, and you’ll be greeted once again by the WebUI interface. This is how you will open the tool in the future, leaving the CMD window open in the background.
Select and Download an LLM
Now that you have the WebUI installed and running, it’s time to find a model to load. As we said, you’ll find thousands of free LLMs you can download and use with WebUI, and the process of installing one is pretty straightforward.
If you want a curated list of the most recommended models, you can check out a community like Reddit’s /r/LocalLlaMA, which includes a community wiki page that lists several dozen models. It also includes information about what different models are built for, as well as data about which models are supported by different hardware. (Some LLMs specialize in coding tasks, while others are built for natural text chat.)
These lists will all end up sending you to Hugging Face, which has become a repository of LLMs and resources. If you came here from Reddit, you were probably directed straight to a model card, which is a dedicated information page about a specific downloadable model. These cards provide general information (like the datasets and training techniques that were used), a list of files to download, and a community page where people can leave feedback as well as request help and bug fixes.
At the top of each model card is a big, bold model name. In our case, we used the the WizardLM 7B Uncensored model made by Eric Hartford. He uses the screen name ehartford, so the model’s listed location is “ehartford/WizardLM-7B-Uncensored,” exactly how it’s listed at the top of the model card.
Next to the title is a little copy icon. Click it, and it will save the properly formatted model name to your clipboard.

(Credit: Brian Westover/Hugging Face)
Back in WebUI, go to the model tab and enter that model name into the field labeled “Download custom model or LoRA.” Paste in the model name, hit Download, and the software will start downloading the necessary files from Hugging Face.

(Credit: Brian Westover/Oobabooga)
If successful, you’ll see an orange progress bar pop up in the WebUI window and several progress bars will appear in the command window you left open in the background.

(Credit: Brian Westover/Oobabooga)

(Credit: Brian Westover/Oobabooga)
Once it’s finished (again, be patient), the WebUI progress bar will disappear and it will simply say “Done!” instead.
Load Your Model and Settings in WebUI
Once you’ve got a model downloaded, you need to load it up in WebUI. To do this, select it from the drop-down menu at the upper left of the model tab. (If you have multiple models downloaded, this is where you choose one to use.)
Before you can use the model, you need to allocate some system or graphics memory (or both) to running it. While you can tweak and fine-tune nearly anything you want in these models, including memory allocation, I’ve found that setting it at roughly two-thirds of both GPU and CPU memory works best. That leaves enough unused memory for your other PC functions while still giving the LLM enough memory to track and hold a longer conversation.

(Credit: Brian Westover/Oobabooga)
Once you’ve allocated memory, hit the Save Settings button to save your choice, and it will default to that memory allocation every time. If you ever want to change it, you can simply reset it and press Save Settings again.
Enjoy Your LLM!
With your model loaded up and ready to go, it’s time to start chatting with your ChatGPT alternative. Navigate within WebUI to the Text Generation tab. Here you’ll see the actual text interface for chatting with the AI. Enter text into the box, hit Enter to send it, and wait for the bot to respond.

(Credit: Brian Westover/Oobabooga)
Here, we’ll say again, is where you’ll experience a little disappointment: Unless you’re using a super-duper workstation with multiple high-end GPUs and massive amounts of memory, your local LLM won’t be anywhere near as quick as ChatGPT or Google Bard. The bot will spit out fragments of words (called tokens) one at a time, with a noticeable delay between each.
However, with a little patience, you can have full conversations with the model you’ve downloaded. You can ask it for information, play chat-based games, even give it one or more personalities. Plus, you can use the LLM with the assurance that your conversations and data are private, which gives peace of mind.
You’ll encounter a ton of content and concepts to explore while starting with local LLMs. As you use WebUI and different models more, you’ll learn more about how they work. If you don’t know your text from your tokens, or your GPTQ from a LoRA, these are ideal places to start immersing yourself in the world of machine learning.
Like What You’re Reading?
Sign up for Tips & Tricks newsletter for expert advice to get the most out of your technology.
This newsletter may contain advertising, deals, or affiliate links. Subscribing to a newsletter indicates your consent to our Terms of Use and Privacy Policy. You may unsubscribe from the newsletters at any time.

Google has confirmed that it plans to shut down Android’s Instant Apps later this year, attributing the decision to “low” usage of the functionality.
Instant Apps were introduced in 2017, and allow developers to create mini versions of Android apps that load, well, instantly. Users can try apps and demo games from the click of a link, without having to fully install them. That makes the experience easier for users to navigate and provides developers with more ways to find new audiences.
Android Authority first reported that Google is moving on from the feature, which came to light after developer Leon Omelan spotted a warning about the change in Android Studio:
“Instant Apps support will be removed by Google Play in December 2025. Publishing and all Google Play Instant APIs will no longer work. Tooling support will be removed in Android Studio Otter Feature Drop.”
Google spokesperson Nia Carter confirmed the decision to The Verge, explaining that Instant Apps simply haven’t been popular enough to continue supporting.
“Usage and engagement of Instant Apps have been low, and developers are leveraging other tools for app discovery such as AI-powered app highlights and simultaneous app installs,” Carter says. “This change allows us to invest more in the tools that are working well for developers, and help direct users to full app downloads to foster deeper engagement.”

NEWYou can now listen to Fox News articles!
Privacy is getting harder to protect in a world where everything is connected.
Whether you’re chatting with an AI, checking your email or using your smartphone, your personal information is constantly being collected, tracked and sometimes even sold.
But protecting your privacy in 2025 doesn’t have to be overwhelming. With a few practical steps, you can take back control of your data and make your online life safer. This guide walks you through 11 easy ways to get started.
Sign up for my FREE CyberGuy Report
Get my best tech tips, urgent security alerts and exclusive deals delivered straight to your inbox. Plus, you’ll get instant access to my Ultimate Scam Survival Guide free when you join.
Scrabble pieces form the word “SCAM.” (Kurt “CyberGuy” Knutsson)
1. Don’t overshare: Even with AI tools like ChatGPT
AI chatbots like ChatGPT are useful, but they’re not private journals. The platform owners may have privacy policies and use the latest security measures, but that doesn’t mean you should let your guard down. When using these tools, refrain from sharing any personal information, such as your name, address, birthdate, passwords, financial details or sensitive conversations. Remember that AI systems store and process your inputs, and despite security promises, data breaches can occur.
SCAMMERS CAN EXPLOIT YOUR DATA FROM JUST 1 CHATGPT SEARCH
Tip: Treat all online forms of AI interaction like public forums. Keep your examples generic and use caution with anything that could identify you.
If you’re going to input your personal information while using these AI tools, ensure there is an option to prevent them from sharing it. On ChatGPT, for instance, do the following:
- Go to Settings.
- Click Data controls.
- Tap Improve the model for everyone.
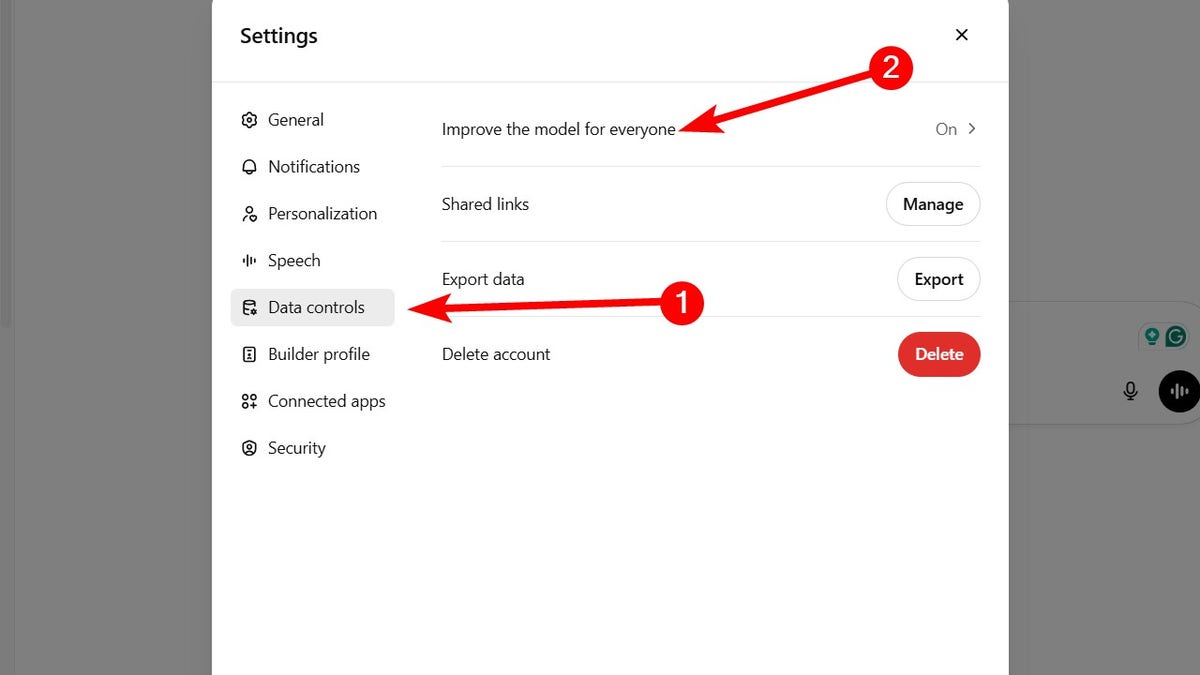
Steps to prevent ChatGPT from sharing your personal information (Kurt “CyberGuy” Knutsson)
- Toggle off Improve the model for everyone.
- Click Done.
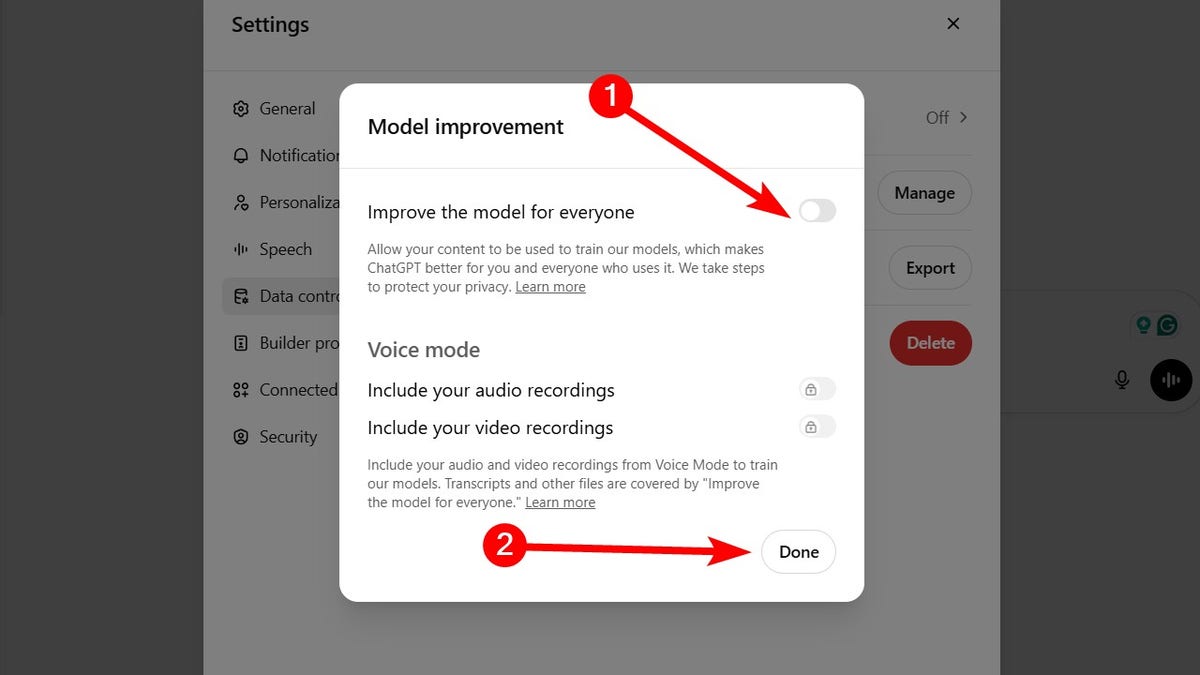
Steps to prevent ChatGPT from sharing your personal information (Kurt “CyberGuy” Knutsson)
Why it matters: AI tools may seem personal, but they’re not secure vaults. Guarding what you share helps prevent misuse, identity theft or data leaks from breaches.
CLEAN UP YOUR PHONE: SPEED, STORAGE AND PRIVACY BOOST IN MINUTES
2. Use alias email addresses
Your email is often the key to your online identity and a common target for spam. By creating disposable email aliases that forward messages to your main inbox, you can keep your real address hidden from websites and services. These unique aliases act as shields, so if one starts getting spammed or is involved in a data breach, you can simply deactivate it without affecting your main email account.
My top recommendation to avoid being inundated with spam emails is to use an alias email address. An alias email address is an additional email address that can be used to receive emails in the same mailbox as the primary email address. It acts as a forwarding address, directing emails to the primary email address.
In addition to creating throwaway email accounts for online sign-ups and other circumstances where you would not want to disclose your primary email address, alias email addresses are helpful for handling and organizing incoming communications.
Sometimes, it’s best to create various email aliases so that you don’t have to worry about getting tons of spam mail or having your information taken in a data breach. An alias email address is a great way for you to stop receiving constant spam mail by simply deleting the email alias address. See my review of the best secure and private email services here.
Why it matters: You stay anonymous, avoid data leaks and never have to change your main email address again.
BEST ANTIVIRUS FOR MAC, PC, IPHONES AND ANDROIDS – CYBERGUY PICKS
3. Take advantage of Facebook’s privacy checkup
Meta frequently updates its privacy settings, so it’s best to check regularly to see how you can improve your privacy. Use Facebook’s Privacy Checkup tool to review and adjust crucial settings, including post visibility, app permissions, search visibility and friend-request settings. This comprehensive tool helps ensure your profile remains as private as you want it to be. You can find the tool by following these steps:
- Log in to your Facebook app on your phone.
- Then click the menu icon in the bottom right.
- Tap Settings.
- Click Privacy Checkup.
Once you open the Privacy Checkup, you’ll be guided through several key areas to customize your privacy preferences and better control your information.
- Who can see what you share: Adjust who can view your posts, photos and profile details to limit access to only people you trust.
- How people can find you on Facebook: Manage who can send you friend requests, look you up using your email or phone number, and decide whether your profile appears in search engines.
- Your data settings on Facebook: Review which apps and websites have access to your Facebook data and remove any you no longer use or trust.
- How to keep your account secure: Set up two-factor authentication, update your password and monitor login alerts to protect your account from unauthorized access.
- Your ad preferences on Facebook: Control how Facebook uses your activity to show you personalized ads and opt out of categories that feel too intrusive.
Quick tip: Set a reminder to run a privacy checkup every few months, especially after major Facebook updates. This way, you’ll always be in control of your information.
Why it matters: Social media platforms thrive on your personal data. Adjusting your settings regularly puts you back in control of what others and Facebook can see and use.
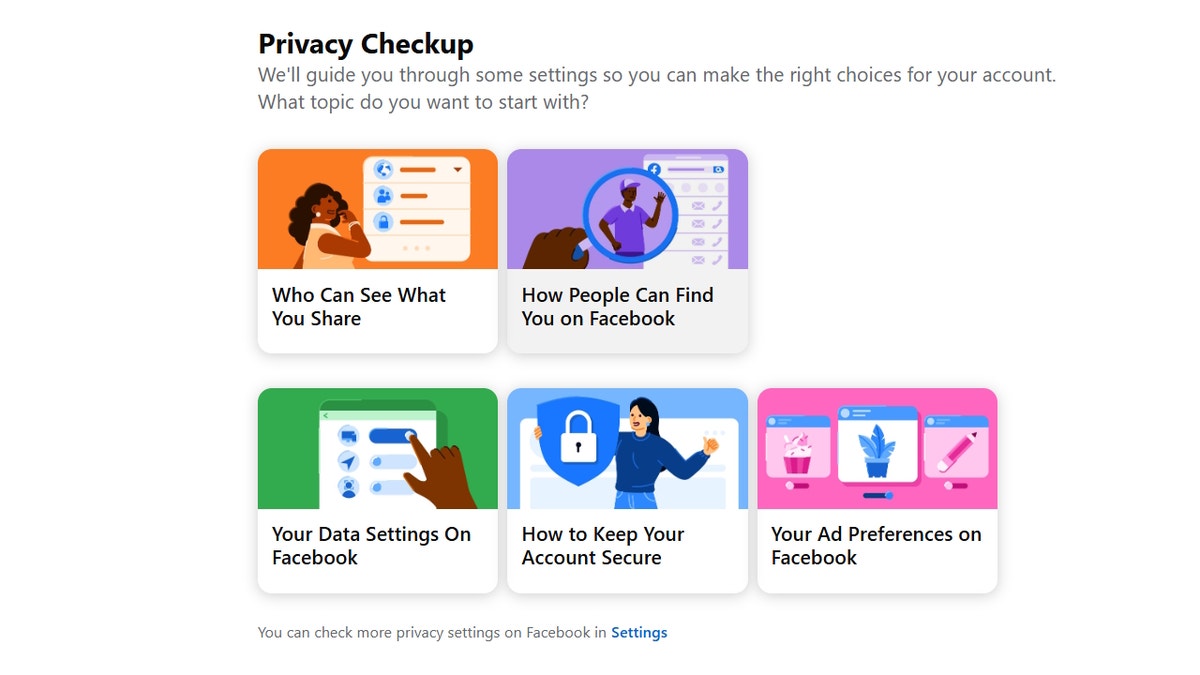
Facebook’s privacy checkup (Kurt “CyberGuy” Knutsson)
HOW TO PROTECT YOUR ONLINE PRIVACY AND SECURITY ON YOUR NEXT CRUISE VACATION
4. Scrub yourself off the internet automatically
Your name, phone number and home address may already be listed on people-search sites like Spokeo, Whitepages and BeenVerified. These data brokers collect and sell your personal information without you even knowing it. Fortunately, personal data removal services are available to protect your privacy. They automatically send legal removal requests to hundreds of data brokers. They also go above and beyond by continuously monitoring them in case these third parties happen to get your information again.
While no service can guarantee the complete removal of your data from the internet, a data removal service is really a smart choice. They aren’t cheap and neither is your privacy. These services do all the work for you by actively monitoring and systematically erasing your personal information from hundreds of websites. It’s what gives me peace of mind and has proven to be the most effective way to erase your personal data from the internet. By limiting the information available, you reduce the risk of scammers cross-referencing data from breaches with information they might find on the dark web, making it harder for them to target you. Check out my top picks for data removal services here.
Get a free scan to find out if your personal information is already out on the web.
Why it matters: The less personal information available about you online, the harder it is for scammers and identity thieves to target you and the more peace of mind you’ll have.
10 SIMPLE STEPS TO IMPROVE YOUR SMARTPHONE’S SECURITY AND PRIVACY
5. Use a privacy-focused messaging app
If you’re still using standard texting apps or platforms like Facebook Messenger, it’s time to upgrade to a more secure option. Apps like Signal and Session offer end-to-end encryption, no ads and no metadata tracking, meaning they can’t see who you’re talking to or what you’re saying. Both apps support disappearing messages, giving you more control over how long your conversations stick around.
Why it matters: Your messages stay private and can’t be accessed by hackers, advertisers or the app developers themselves.
6. Stop Google from tracking your every move
Google collects a massive amount of data from your searches, YouTube views, Gmail activity and location history, all of which fuels targeted advertising. You can stop much of this tracking by turning off Ad Personalization and deleting your activity history. Here’s what to do:
- Go to Google’s My Ad Center.
- Find the Ad Personalization section.
- Toggle the switch to turn off ad personalization. This stops Google from using your activity to tailor ads.
Manage activity history
- In My Ad Center or via your Google Account, go to Data & Privacy.
- Under History Settings, review and pause or delete: Web & App Activity, YouTube History and Location History (if applicable).
Delete existing activity data
- Select Manage all Web & App Activity, Manage all YouTube History, etc.
- Delete past activity by choosing a time range (e.g., “All time”) and confirming deletion for each category.
Opt out of third-party ad personalization
- Scroll to Ad settings and look for third-party ad personalization options.
- Opt out of partner sites’ ad personalization if available.
- If you have multiple Google accounts, repeat these steps for each account.
Why it matters: Cutting down on ad tracking reduces how much of your online behavior is used to build a profile on you, often without your knowledge.
7. Turn off location tracking on your smartphone
Apps don’t need to know your every move. Disabling or limiting location tracking is one of the simplest ways to protect your physical privacy. Here’s what to do:
iPhone:
- Go to Settings.
- Tap Privacy & Security.
- Click Location Services.
- Scroll down and tap the app you want to manage.
- Choose your preferred setting: Never to block location access completely; Ask Next Time Or When I Share to allow location only with your permission; While Using the App to allow location only when the app is open.
For apps like Maps, toggle Precise Location off to prevent pinpoint tracking.
To disable location tracking entirely, toggle Location Services off at the top of the Location Services page (this will stop all apps from using your location).
Android:
Settings may vary depending on your Android phone’s manufacturer.
- Go to Settings.
- Tap Location.
- Tap App permissions or App location permissions.
- You will see a list of apps grouped by their location access: Allowed all the time; Allowed only while in use; Ask every time; Not allowed.
- Tap any app to change its location permission. Choose from: Allow all the time; Allow only while using the app; Ask every time; Don’t allow.
For apps that have location access, you can also turn Precise location on or off if you want to limit accuracy. Repeat for each app you want to manage.
Tip: If you want to stop all apps from accessing your location, you can turn off Location at the top of the Location settings page.
Why it matters: Prevents apps, advertisers and even your OS from building a detailed map of your daily routines.
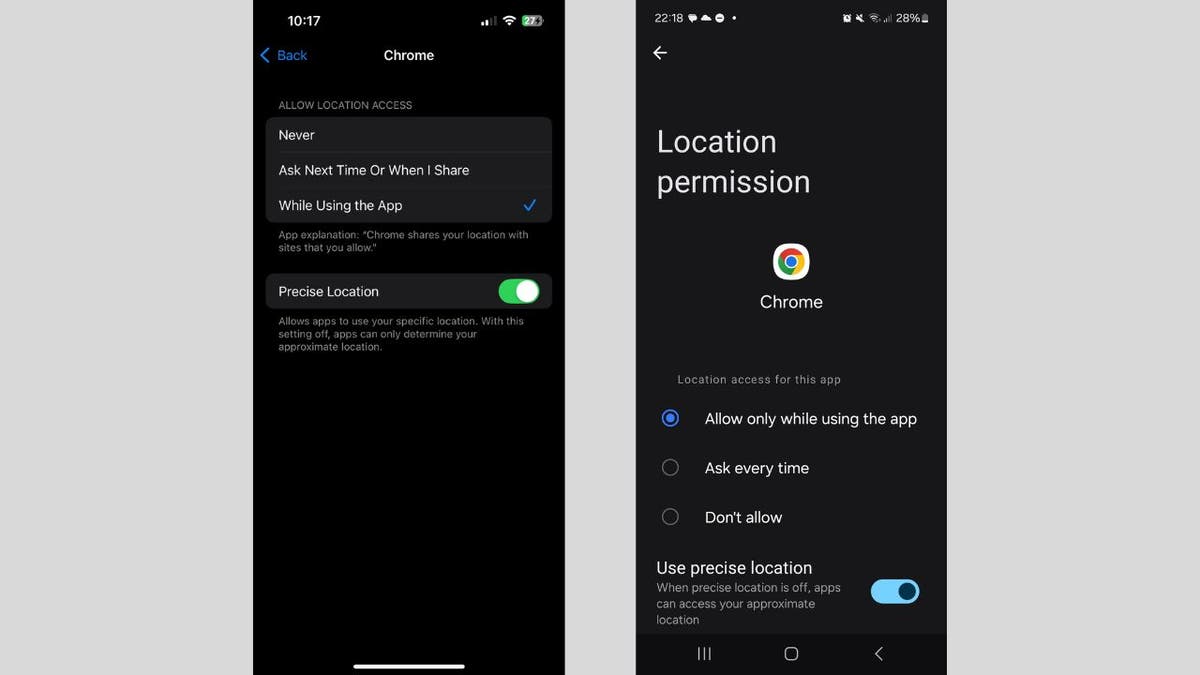
Steps to turn off location tracking on your smartphone (Kurt “CyberGuy” Knutsson)
WHAT IS ARTIFICIAL INTELLIGENCE (AI)?
8. Change the default admin password on your router
Most routers ship with default admin usernames and passwords like “admin” or “1234,” and these are publicly available online. Hackers know this and often scan networks looking for unprotected routers. Here’s what to do:
- Log in to your router’s settings via its IP address (often 192.168.1.1 or 192.168.0.1).
- Change the admin username and password to something strong and unique.
- Consider using a password manager to generate and store complex passwords. Get more details about my best expert-reviewed password managers of 2025 here.
Why it matters: Prevents intruders from hijacking your home network and spying on your devices.
9. Enable WPA3 encryption on your Wi-Fi router
WPA3 is the newest wireless encryption protocol and offers much stronger protection than WPA2. If your router supports WPA3, enabling it is a no-brainer. How to check:
- Log into your router settings and look under Wireless Security.
- If WPA3 is available, enable it.
- If not, consider upgrading to a newer, security-focused router. Check out our top routers for best security 2025.
Why it matters: Stronger encryption means hackers can’t easily intercept or crack your Wi-Fi traffic.
10. Set up a guest network for visitors and smart devices
Your friends don’t need access to your entire home network and neither do your smart lights and doorbells. Creating a guest network adds a safety barrier between your personal devices and less trustworthy ones. Steps to take:
- Log into your router settings.
- Create a separate guest network with its own password.
- Connect smart devices, TVs and guests to this network only.
- Keep your main network just for personal computers and phones.
Why it matters: Even if a smart device gets compromised, the attacker won’t have access to your main network or sensitive devices.
11. Use a secure, private browser for sensitive browsing
Not all browsers treat your privacy equally. Switching to a browser designed for privacy like Brave, Firefox or DuckDuckGo’s browser can drastically cut down on the amount of data collected about you while you browse. Also, use incognito/private mode for sensitive searches.
Why it matters: Reduces digital fingerprints and helps stop advertisers and data brokers from building a profile on you based on your browsing behavior.
SUBSCRIBE TO KURT’S YOUTUBE CHANNEL FOR QUICK VIDEO TIPS ON HOW TO WORK ALL OF YOUR TECH DEVICES
Kurt’s key takeaways
Staying private online isn’t about being paranoid; it’s about making smart, intentional choices. With the right tools and a few small changes, you can take back control of your data in 2025. Digital privacy is always changing, so it’s a good idea to check your settings and habits every so often. The upside is that for every new privacy challenge, there’s usually a way to push back and keep your information safe.
If you’d like a printable checklist or want this content turned into a shareable infographic, just let me know.
What privacy tools and methods do you use to protect your data online? Let us know by writing us at Cyberguy.com/Contact.
For more of my tech tips and security alerts, subscribe to my free CyberGuy Report Newsletter by heading to Cyberguy.com/Newsletter.
Ask Kurt a question or let us know what stories you’d like us to cover.
Follow Kurt on his social channels:
Answers to the most-asked CyberGuy questions:
New from Kurt:
Copyright 2025 CyberGuy.com. All rights reserved.

The recall covers about 1,158,000 units that were sold online through Amazon, Newegg, and eBay between June 2016 and December 2022. The affected batteries can be identified by the Anker logo engraved on the side with the model number A1263 printed on the bottom edge. However, Anker is only recalling units sold in the US with qualifying serial numbers. To check if yours is included, you’ll need to visit Anker’s website.
Anker is offering affected consumers their choice of either a $30 gift card (the recalled battery cost around $27) that can be used on Anker.com, or a free 10,000mAh Anker power bank as a replacement (model A1388) featuring upgrades including a charge level display and a USB-C charging cable lanyard.
To receive the gift card or the replacement, Anker requires a “photo of the power bank with the submission date and the word ‘recall’ or ‘recalled’ written clearly in permanent marker,” to be submitted, and a “photo showing the model number and serial number (SN) printed on the bottom of the device.” The company is also requesting a purchase receipt, but it’s not mandatory to participate in the recall.
After confirming that your power bank is one of the recalled units, Anker says it should be taken to a facility that can safely dispose of lithium-ion batteries due to the risk of fire. Those facilities can be found through the Environmental Protection Agency’s website or other organizations in the US that specialize in processing e-waste. Do not throw them in the trash, recycling bins, or used battery boxes provided at various retail locations.
The recall is also a reminder that power banks and backup batteries can potentially develop severe issues over time, as these particular units are almost a decade old. If you’ve been regularly using devices featuring lithium-ion batteries for a while, you’ll want to be mindful of issues like overheating or visible swelling and dispose of them properly if you think there’s a potential problem. And while the technology is currently more expensive than lithium-ion batteries, you can also consider upgrading to solid-state batteries which are more powerful, safer, and longer lasting than what we commonly use now to power our devices.

'No Kings Day': Thousands to protest Trump in Metro Detroit and across the country

'It takes the hood to save the hood': United Playaz expands its work in San Francisco

Community leaders urge peace, safety at Dallas’ ‘No Kings’ protest on Saturday

Miami Beach foot pursuit ends with suspect struck by police SUV, video shows

Boston Public Health Commission says person with measles visited Boston – Boston News, Weather, Sports | WHDH 7News


-

 West7 days ago
Battle over Space Command HQ location heats up as lawmakers press new Air Force secretary
-
 Technology1 week ago
iFixit says the Switch 2 is even harder to repair than the original
-
 World1 week ago
EU-Ukraine trade reset: What comes after tariff-free access expires?
-
 Politics1 week ago
Hawley clashes with UPenn law professor over judicial injunctions
-
 Technology1 week ago
The single best wireless controller I’ve ever used
-
 Business1 week ago
How Hard It Is to Make Trade Deals
-
 Movie Review | FlickDirect") Movie Reviews1 week ago
Movie Reviews1 week agoPredator: Killer of Killers (2025) Movie Review | FlickDirect
-
 News1 week ago
Trump’s Higher Steel Tariffs Sour Mood at Deal-Making Table