Technology
Dig Deeper Into Windows 11 With These 7 Task Manager Tips

PC energy customers have lengthy made use of the Home windows Activity supervisor for perception into simply what’s happening of their system. In Home windows 11, the Activity Supervisor is all new, with redesigned icons, a fresh-looking window, and new options that show you how to cut back the facility draw of apps working within the background.
So what can the brand new Home windows 11 Activity Supervisor do? We stroll you thru a few of the most useful methods you can also make use of this utility. However first, we present you tips on how to get to it.
(Credit score: PCMag)
How Do You Get to the Activity Supervisor in Home windows 11?
The best option to open Activity Supervisor is to press its keyboard shortcut: Ctrl-Shift-Esc. It’s also possible to right-click the Begin button and select it from the ensuing context menu. Merely typing Activity within the Begin menu will present it as the highest possibility. Clicking that opens it.
In a future model of Home windows 11, you’ll additionally be capable of summon the Activity Supervisor by right-clicking on the Taskbar and selecting it from the ensuing menu.

(Credit score: Microsoft)
As a final resort, you should use the good-old emergency keyboard shortcut, Ctrl-Alt-Del, and select Activity Supervisor from its full display screen menu.
Now let’s take a look at what you are able to do with the Activity Supervisor in Home windows 11.
1. Discover Out What’s Slowing Down Your PC
One of many extra frequent makes use of for Activity Supervisor is to seek out the wrongdoer when your PC is sluggish. Open the Activity Supervisor and click on on the highest of the CPU column to kind by CPU utilization. If an utility is hogging the CPU, it could possibly be the wrongdoer.
One other factor to have a look at is Disk. Kind by that column with the very best MB quantities on prime to see whether or not an app is overly taxing your storage system.
For video video games and video enhancing, you wish to add the GPU column, which doesn’t show by default. Proper-click wherever within the header column and click on to the left of GPU. Now you possibly can kind by every utility’s GPU utilization to see which of them are taxing it.
2. Shut Down Misbehaving Apps

(Credit score: PCMag)
In the event you’re working a program that’s not responding and never letting you shut it, Activity Supervisor is your greatest buddy. Simply click on on the entry in this system checklist and faucet the 🚫Finish job button or right-click and select Finish job. That bypasses any code in this system stopping you from shutting it down the conventional means.
Be aware that the subsequent time you run this system, it might pop up a message saying one thing like, “This system shut down abnormally final time,” and presumably ask if you wish to ship its maker an error report.
Generally you possibly can repair a nonresponsive app by shutting down a subprocess of the app fairly than the entire app. The CPU and different utilization stats may present excessive utilization for some subprocess, which is able to level to the wrongdoer. Simply click on on the arrow subsequent to the entry and if one explicit course of is indicating excessive CPU or disk utilization, zap that one. Now you can zap an app with a shortcut key Ctrl-E.
3. Handle Which Apps and Processes Begin Up Routinely

(Credit score: PCMag)
Typically while you set up an utility, it units some processes to begin up robotically along with your PC. The outcome could be that numerous processes are working even while you don’t wish to use the related purposes. Yow will discover such auto working processes In Activity Supervisor’s Startup Apps part. In the event you discover one thing in there that you simply don’t really feel is critical to be working each time you flip your pc on, it’s a easy matter to Choose the method after which faucet the Disable button. It’s also possible to right-click the method and select Disable from the context menu.
Professional tip: Activity Supervisor additionally has a Companies web page. A service is a course of that runs within the background for all customers and is managed by Home windows—they don’t have person interfaces. They’re helpful for working your printer service, antivirus software program, or the system clock, to present just a few examples. Some applications set up them and depart them working whether or not or not you’ve got the related app open. In the event you don’t need something from that program working, you possibly can disable its providers.

(Credit score: PCMag)
As a substitute of utilizing the Activity Supervisor to close down undesirable providers, I favor the next methodology: Open the Begin menu, kind Run, and kind msconfig within the ensuing Run textual content field and swap to the Companies tab. It’s a good suggestion to test the Conceal All Microsoft Companies checkbox, so that you simply don’t shut down important system providers. Then uncheck the undesirable providers and reboot your PC for the adjustments to take impact.
By the best way, for both of those shutdowns, you normally don’t have to fret about Home windows not functioning afterward as a result of Home windows normally prevents you from disabling obligatory processes and providers, or the OS spins them proper again up. That stated, it’s not advisable to cease providers that you simply don’t acknowledge. Additionally, be warned that the service received’t run the subsequent time you run the related utility, so chances are you’ll must re-enable them for performance.
Really helpful by Our Editors
4. Determine What’s Bogging Down Your Web Connection

(Credit score: PCMag)
In the event you suspect an utility is phoning house by your web connection, the Activity Supervisor offers you a option to decide whether or not that’s the case. Have a look at the Community column and see if there’s any exercise for the app or course of in query. In the event you don’t see any exercise in the intervening time however nonetheless suspect the app is connecting to the web, head to the Activity Supervisor’s App Historical past tab. Right here, you possibly can see all of the useful resource utilization for the app throughout its final run session. For recognized streaming and syncing apps, in fact you count on some community transfers, however apps that don’t have any enterprise sending information out out of your pc could benefit additional investigation.
5. Use the New Effectivity Mode

(Credit score: PCMag)
One other column you possibly can add to the Activity Supervisor’s checklist is Energy Utilization. It doesn’t present numbers, however fairly Low, Excessive, or Very Excessive. It summarizes the app’s use of all the opposite {hardware} elements you see individually in earlier columns. Generally there’s no getting round utilizing an app with excessive energy wants, however you might even see one thing in there that you simply don’t count on, and you may then shut down its course of.
To make use of the brand new Effectivity mode, faucet on a course of entry to pick it. Then click on the Effectivity mode button at prime proper. A warning message tells you that turning on the mode will decrease the method’s precedence and presumably trigger an related utility to run with instability. Be aware that you may solely use this mode for processes, not on the general app entry within the prime checklist. Faucet the arrow to develop an app entry to indicate its subprocesses, click on on the resource-hungry course of, after which choose Effectivity mode.
I attempted it with the Adobe Artistic Cloud desktop app, which was taking on greater than 35% of my PC’s CPU processing energy. After clicking the Effectivity mode button, it dropped to fifteen%. A brand new keyboard shortcut enables you to put an app within the mode: Alt-V.
6. See Actual-Time Efficiency Statistics

(Credit score: PCMag)
If you wish to see the results of working an app, app process, or recreation in your PC, head to the Activity Supervisor’s Efficiency web page. It reveals you a stay graph of CPU, Reminiscence, Disk, Wi-Fi, and GPU utilization. To repeat the date to the clipboard in textual content format, you possibly can both choose the overflow menu (that’s, the ellipsis or “…”) at prime proper and select Copy, or you possibly can right-click on the CPU, Reminiscence header and select Copy. A right-click additionally presents a Abstract view, which reveals simply the 4 efficiency entries in a small window.
7. See Suspended UWP Apps

(Credit score: PCMag)
A brand new function of the Taskbar for Home windows 11’s 22H2 model enables you to see which UWP apps are paused to spare processing energy and enhance effectivity of energy utilization. The yellow Pause icon is your clue that an app which will look like working and utilizing system sources is definitely in pause mode. Be aware that that is solely informational. You may’t pause and unpause the apps your self, as a result of that state is decided by the system primarily based on the app’s exercise. In the event you actually wish to do that manually, you need to open one other utility, the Useful resource Monitor (kind resmon within the Run field). There you possibly can right-click on the app’s course of to droop or resume it. Nevertheless, I don’t suggest doing it, because it might have sudden penalties or trigger system instability.
Extra on Home windows 11
For extra full protection of Microsoft’s new working system, learn our in-depth Home windows 11 evaluation and remember to test our Home windows 11 web page for the newest information, ideas, and evaluations. Lastly, you possibly can join our Home windows 11 publication.
Like What You are Studying?
Join Ideas & Methods publication for skilled recommendation to get probably the most out of your expertise.
This article could include promoting, offers, or affiliate hyperlinks. Subscribing to a publication signifies your consent to our Phrases of Use and Privateness Coverage. You might unsubscribe from the newsletters at any time.

Google has confirmed that it plans to shut down Android’s Instant Apps later this year, attributing the decision to “low” usage of the functionality.
Instant Apps were introduced in 2017, and allow developers to create mini versions of Android apps that load, well, instantly. Users can try apps and demo games from the click of a link, without having to fully install them. That makes the experience easier for users to navigate and provides developers with more ways to find new audiences.
Android Authority first reported that Google is moving on from the feature, which came to light after developer Leon Omelan spotted a warning about the change in Android Studio:
“Instant Apps support will be removed by Google Play in December 2025. Publishing and all Google Play Instant APIs will no longer work. Tooling support will be removed in Android Studio Otter Feature Drop.”
Google spokesperson Nia Carter confirmed the decision to The Verge, explaining that Instant Apps simply haven’t been popular enough to continue supporting.
“Usage and engagement of Instant Apps have been low, and developers are leveraging other tools for app discovery such as AI-powered app highlights and simultaneous app installs,” Carter says. “This change allows us to invest more in the tools that are working well for developers, and help direct users to full app downloads to foster deeper engagement.”

NEWYou can now listen to Fox News articles!
Privacy is getting harder to protect in a world where everything is connected.
Whether you’re chatting with an AI, checking your email or using your smartphone, your personal information is constantly being collected, tracked and sometimes even sold.
But protecting your privacy in 2025 doesn’t have to be overwhelming. With a few practical steps, you can take back control of your data and make your online life safer. This guide walks you through 11 easy ways to get started.
Sign up for my FREE CyberGuy Report
Get my best tech tips, urgent security alerts and exclusive deals delivered straight to your inbox. Plus, you’ll get instant access to my Ultimate Scam Survival Guide free when you join.
Scrabble pieces form the word “SCAM.” (Kurt “CyberGuy” Knutsson)
1. Don’t overshare: Even with AI tools like ChatGPT
AI chatbots like ChatGPT are useful, but they’re not private journals. The platform owners may have privacy policies and use the latest security measures, but that doesn’t mean you should let your guard down. When using these tools, refrain from sharing any personal information, such as your name, address, birthdate, passwords, financial details or sensitive conversations. Remember that AI systems store and process your inputs, and despite security promises, data breaches can occur.
SCAMMERS CAN EXPLOIT YOUR DATA FROM JUST 1 CHATGPT SEARCH
Tip: Treat all online forms of AI interaction like public forums. Keep your examples generic and use caution with anything that could identify you.
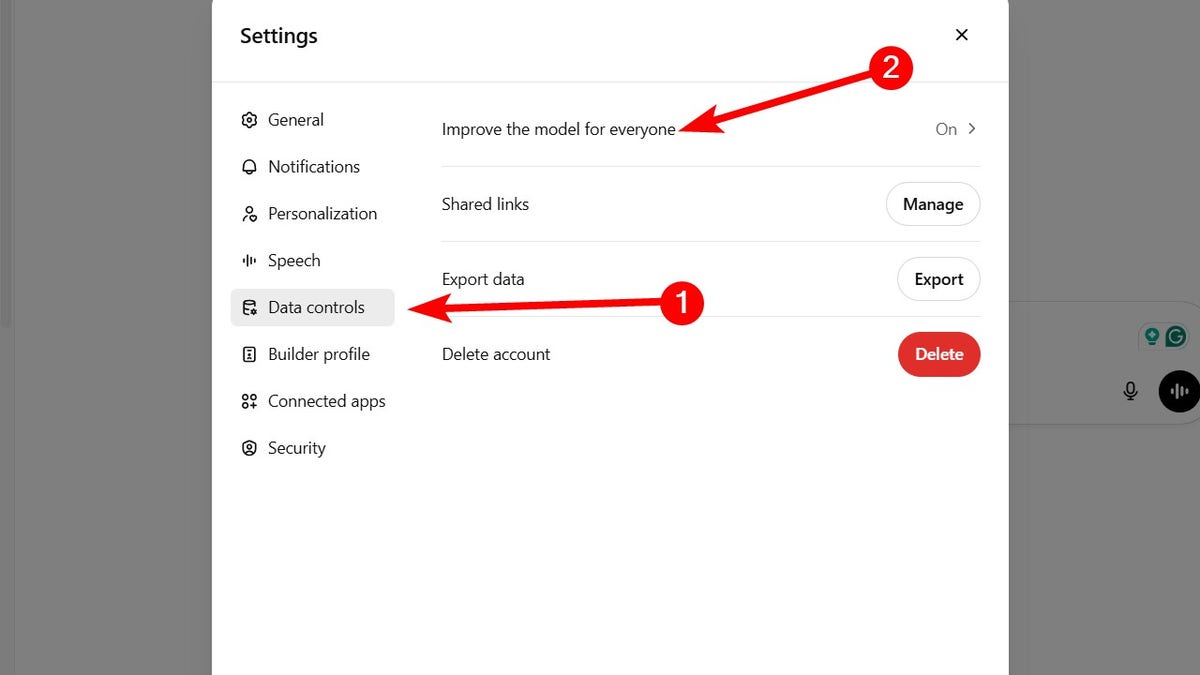
If you’re going to input your personal information while using these AI tools, ensure there is an option to prevent them from sharing it. On ChatGPT, for instance, do the following:
- Go to Settings.
- Click Data controls.
- Tap Improve the model for everyone.
Steps to prevent ChatGPT from sharing your personal information (Kurt “CyberGuy” Knutsson)
- Toggle off Improve the model for everyone.
- Click Done.
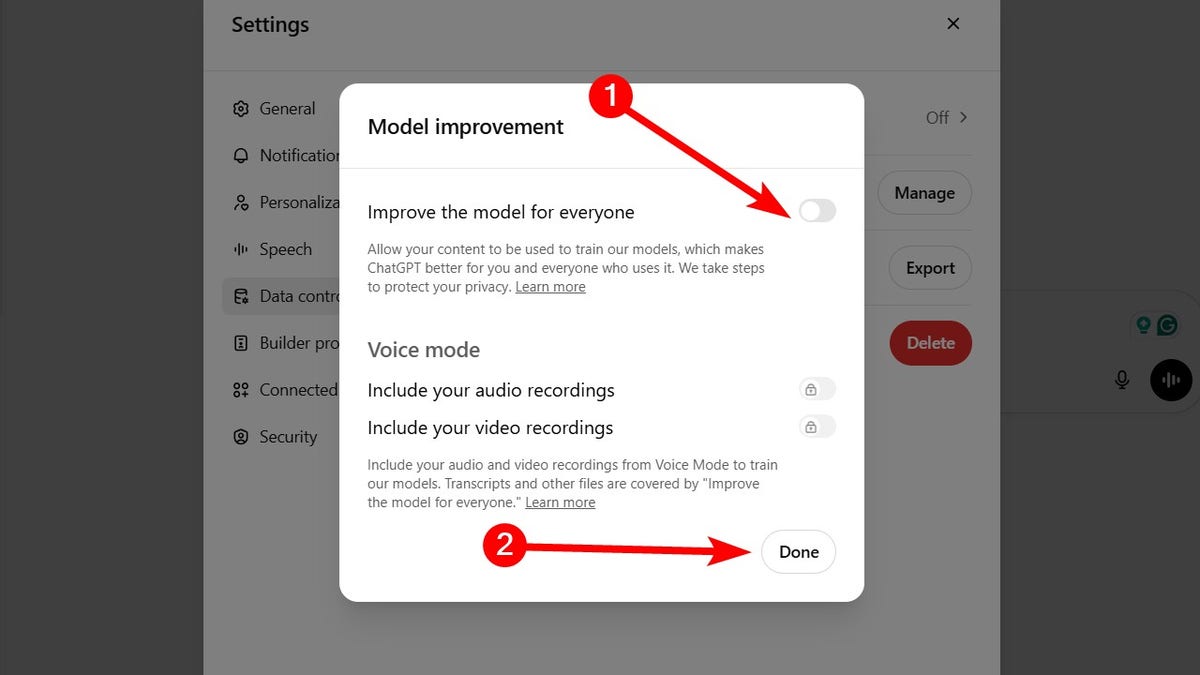
Steps to prevent ChatGPT from sharing your personal information (Kurt “CyberGuy” Knutsson)
Why it matters: AI tools may seem personal, but they’re not secure vaults. Guarding what you share helps prevent misuse, identity theft or data leaks from breaches.
CLEAN UP YOUR PHONE: SPEED, STORAGE AND PRIVACY BOOST IN MINUTES
2. Use alias email addresses
Your email is often the key to your online identity and a common target for spam. By creating disposable email aliases that forward messages to your main inbox, you can keep your real address hidden from websites and services. These unique aliases act as shields, so if one starts getting spammed or is involved in a data breach, you can simply deactivate it without affecting your main email account.
My top recommendation to avoid being inundated with spam emails is to use an alias email address. An alias email address is an additional email address that can be used to receive emails in the same mailbox as the primary email address. It acts as a forwarding address, directing emails to the primary email address.
In addition to creating throwaway email accounts for online sign-ups and other circumstances where you would not want to disclose your primary email address, alias email addresses are helpful for handling and organizing incoming communications.
Sometimes, it’s best to create various email aliases so that you don’t have to worry about getting tons of spam mail or having your information taken in a data breach. An alias email address is a great way for you to stop receiving constant spam mail by simply deleting the email alias address. See my review of the best secure and private email services here.
Why it matters: You stay anonymous, avoid data leaks and never have to change your main email address again.
BEST ANTIVIRUS FOR MAC, PC, IPHONES AND ANDROIDS – CYBERGUY PICKS
3. Take advantage of Facebook’s privacy checkup
Meta frequently updates its privacy settings, so it’s best to check regularly to see how you can improve your privacy. Use Facebook’s Privacy Checkup tool to review and adjust crucial settings, including post visibility, app permissions, search visibility and friend-request settings. This comprehensive tool helps ensure your profile remains as private as you want it to be. You can find the tool by following these steps:
- Log in to your Facebook app on your phone.
- Then click the menu icon in the bottom right.
- Tap Settings.
- Click Privacy Checkup.
Once you open the Privacy Checkup, you’ll be guided through several key areas to customize your privacy preferences and better control your information.
- Who can see what you share: Adjust who can view your posts, photos and profile details to limit access to only people you trust.
- How people can find you on Facebook: Manage who can send you friend requests, look you up using your email or phone number, and decide whether your profile appears in search engines.
- Your data settings on Facebook: Review which apps and websites have access to your Facebook data and remove any you no longer use or trust.
- How to keep your account secure: Set up two-factor authentication, update your password and monitor login alerts to protect your account from unauthorized access.
- Your ad preferences on Facebook: Control how Facebook uses your activity to show you personalized ads and opt out of categories that feel too intrusive.
Quick tip: Set a reminder to run a privacy checkup every few months, especially after major Facebook updates. This way, you’ll always be in control of your information.
Why it matters: Social media platforms thrive on your personal data. Adjusting your settings regularly puts you back in control of what others and Facebook can see and use.
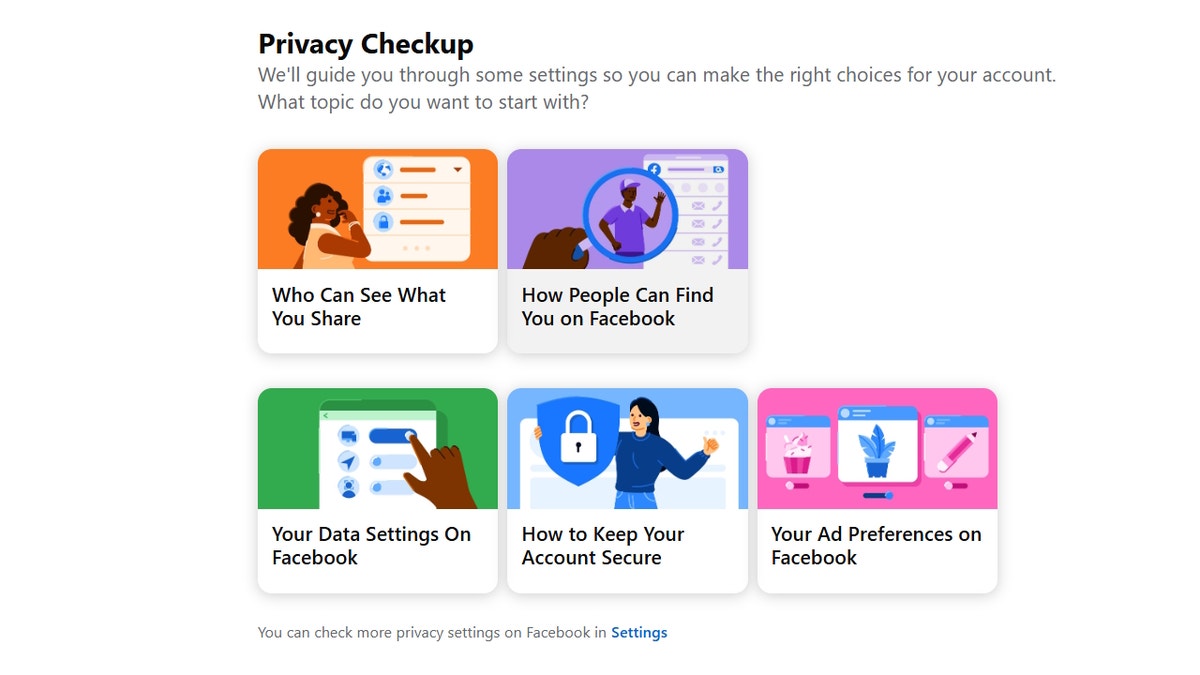
Facebook’s privacy checkup (Kurt “CyberGuy” Knutsson)
HOW TO PROTECT YOUR ONLINE PRIVACY AND SECURITY ON YOUR NEXT CRUISE VACATION
4. Scrub yourself off the internet automatically
Your name, phone number and home address may already be listed on people-search sites like Spokeo, Whitepages and BeenVerified. These data brokers collect and sell your personal information without you even knowing it. Fortunately, personal data removal services are available to protect your privacy. They automatically send legal removal requests to hundreds of data brokers. They also go above and beyond by continuously monitoring them in case these third parties happen to get your information again.
While no service can guarantee the complete removal of your data from the internet, a data removal service is really a smart choice. They aren’t cheap and neither is your privacy. These services do all the work for you by actively monitoring and systematically erasing your personal information from hundreds of websites. It’s what gives me peace of mind and has proven to be the most effective way to erase your personal data from the internet. By limiting the information available, you reduce the risk of scammers cross-referencing data from breaches with information they might find on the dark web, making it harder for them to target you. Check out my top picks for data removal services here.
Get a free scan to find out if your personal information is already out on the web.
Why it matters: The less personal information available about you online, the harder it is for scammers and identity thieves to target you and the more peace of mind you’ll have.
10 SIMPLE STEPS TO IMPROVE YOUR SMARTPHONE’S SECURITY AND PRIVACY
5. Use a privacy-focused messaging app
If you’re still using standard texting apps or platforms like Facebook Messenger, it’s time to upgrade to a more secure option. Apps like Signal and Session offer end-to-end encryption, no ads and no metadata tracking, meaning they can’t see who you’re talking to or what you’re saying. Both apps support disappearing messages, giving you more control over how long your conversations stick around.
Why it matters: Your messages stay private and can’t be accessed by hackers, advertisers or the app developers themselves.
6. Stop Google from tracking your every move
Google collects a massive amount of data from your searches, YouTube views, Gmail activity and location history, all of which fuels targeted advertising. You can stop much of this tracking by turning off Ad Personalization and deleting your activity history. Here’s what to do:
- Go to Google’s My Ad Center.
- Find the Ad Personalization section.
- Toggle the switch to turn off ad personalization. This stops Google from using your activity to tailor ads.
Manage activity history
- In My Ad Center or via your Google Account, go to Data & Privacy.
- Under History Settings, review and pause or delete: Web & App Activity, YouTube History and Location History (if applicable).
Delete existing activity data
- Select Manage all Web & App Activity, Manage all YouTube History, etc.
- Delete past activity by choosing a time range (e.g., “All time”) and confirming deletion for each category.
Opt out of third-party ad personalization
- Scroll to Ad settings and look for third-party ad personalization options.
- Opt out of partner sites’ ad personalization if available.
- If you have multiple Google accounts, repeat these steps for each account.
Why it matters: Cutting down on ad tracking reduces how much of your online behavior is used to build a profile on you, often without your knowledge.
7. Turn off location tracking on your smartphone
Apps don’t need to know your every move. Disabling or limiting location tracking is one of the simplest ways to protect your physical privacy. Here’s what to do:
iPhone:
- Go to Settings.
- Tap Privacy & Security.
- Click Location Services.
- Scroll down and tap the app you want to manage.
- Choose your preferred setting: Never to block location access completely; Ask Next Time Or When I Share to allow location only with your permission; While Using the App to allow location only when the app is open.
For apps like Maps, toggle Precise Location off to prevent pinpoint tracking.
To disable location tracking entirely, toggle Location Services off at the top of the Location Services page (this will stop all apps from using your location).
Android:
Settings may vary depending on your Android phone’s manufacturer.
- Go to Settings.
- Tap Location.
- Tap App permissions or App location permissions.
- You will see a list of apps grouped by their location access: Allowed all the time; Allowed only while in use; Ask every time; Not allowed.
- Tap any app to change its location permission. Choose from: Allow all the time; Allow only while using the app; Ask every time; Don’t allow.
For apps that have location access, you can also turn Precise location on or off if you want to limit accuracy. Repeat for each app you want to manage.
Tip: If you want to stop all apps from accessing your location, you can turn off Location at the top of the Location settings page.
Why it matters: Prevents apps, advertisers and even your OS from building a detailed map of your daily routines.
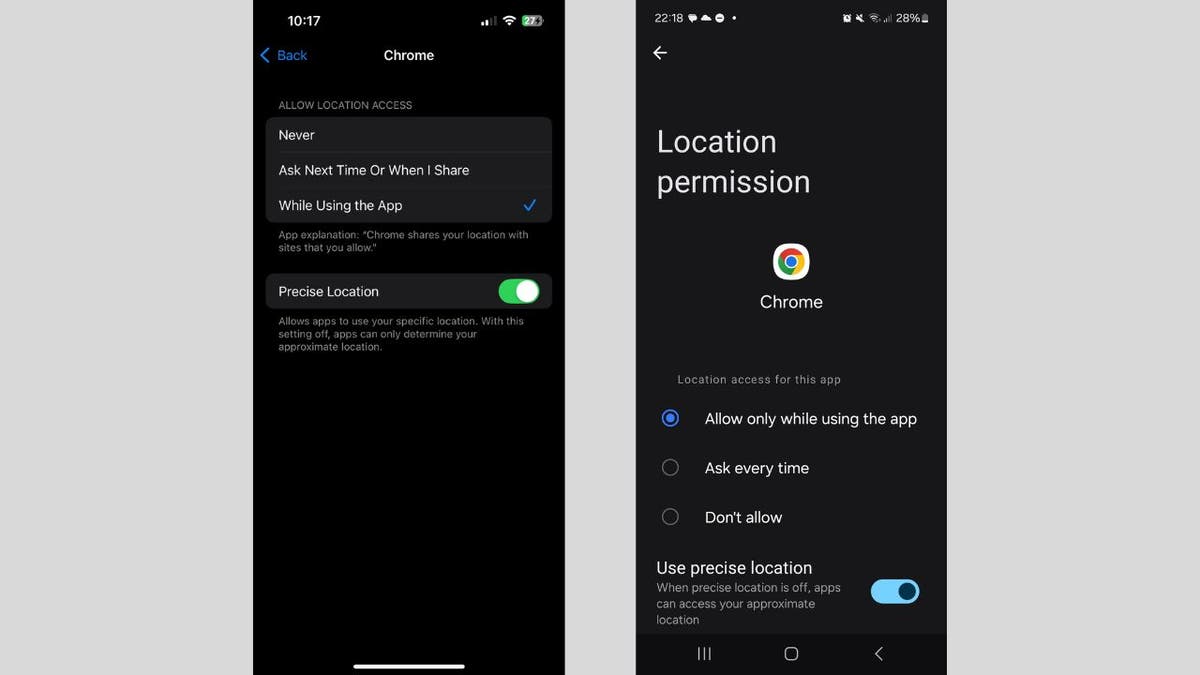
Steps to turn off location tracking on your smartphone (Kurt “CyberGuy” Knutsson)
WHAT IS ARTIFICIAL INTELLIGENCE (AI)?
8. Change the default admin password on your router
Most routers ship with default admin usernames and passwords like “admin” or “1234,” and these are publicly available online. Hackers know this and often scan networks looking for unprotected routers. Here’s what to do:
- Log in to your router’s settings via its IP address (often 192.168.1.1 or 192.168.0.1).
- Change the admin username and password to something strong and unique.
- Consider using a password manager to generate and store complex passwords. Get more details about my best expert-reviewed password managers of 2025 here.
Why it matters: Prevents intruders from hijacking your home network and spying on your devices.
9. Enable WPA3 encryption on your Wi-Fi router
WPA3 is the newest wireless encryption protocol and offers much stronger protection than WPA2. If your router supports WPA3, enabling it is a no-brainer. How to check:
- Log into your router settings and look under Wireless Security.
- If WPA3 is available, enable it.
- If not, consider upgrading to a newer, security-focused router. Check out our top routers for best security 2025.
Why it matters: Stronger encryption means hackers can’t easily intercept or crack your Wi-Fi traffic.
10. Set up a guest network for visitors and smart devices
Your friends don’t need access to your entire home network and neither do your smart lights and doorbells. Creating a guest network adds a safety barrier between your personal devices and less trustworthy ones. Steps to take:
- Log into your router settings.
- Create a separate guest network with its own password.
- Connect smart devices, TVs and guests to this network only.
- Keep your main network just for personal computers and phones.
Why it matters: Even if a smart device gets compromised, the attacker won’t have access to your main network or sensitive devices.
11. Use a secure, private browser for sensitive browsing
Not all browsers treat your privacy equally. Switching to a browser designed for privacy like Brave, Firefox or DuckDuckGo’s browser can drastically cut down on the amount of data collected about you while you browse. Also, use incognito/private mode for sensitive searches.
Why it matters: Reduces digital fingerprints and helps stop advertisers and data brokers from building a profile on you based on your browsing behavior.
SUBSCRIBE TO KURT’S YOUTUBE CHANNEL FOR QUICK VIDEO TIPS ON HOW TO WORK ALL OF YOUR TECH DEVICES
Kurt’s key takeaways
Staying private online isn’t about being paranoid; it’s about making smart, intentional choices. With the right tools and a few small changes, you can take back control of your data in 2025. Digital privacy is always changing, so it’s a good idea to check your settings and habits every so often. The upside is that for every new privacy challenge, there’s usually a way to push back and keep your information safe.
If you’d like a printable checklist or want this content turned into a shareable infographic, just let me know.
What privacy tools and methods do you use to protect your data online? Let us know by writing us at Cyberguy.com/Contact.
For more of my tech tips and security alerts, subscribe to my free CyberGuy Report Newsletter by heading to Cyberguy.com/Newsletter.
Ask Kurt a question or let us know what stories you’d like us to cover.
Follow Kurt on his social channels:
Answers to the most-asked CyberGuy questions:
New from Kurt:
Copyright 2025 CyberGuy.com. All rights reserved.

The recall covers about 1,158,000 units that were sold online through Amazon, Newegg, and eBay between June 2016 and December 2022. The affected batteries can be identified by the Anker logo engraved on the side with the model number A1263 printed on the bottom edge. However, Anker is only recalling units sold in the US with qualifying serial numbers. To check if yours is included, you’ll need to visit Anker’s website.
Anker is offering affected consumers their choice of either a $30 gift card (the recalled battery cost around $27) that can be used on Anker.com, or a free 10,000mAh Anker power bank as a replacement (model A1388) featuring upgrades including a charge level display and a USB-C charging cable lanyard.
To receive the gift card or the replacement, Anker requires a “photo of the power bank with the submission date and the word ‘recall’ or ‘recalled’ written clearly in permanent marker,” to be submitted, and a “photo showing the model number and serial number (SN) printed on the bottom of the device.” The company is also requesting a purchase receipt, but it’s not mandatory to participate in the recall.
After confirming that your power bank is one of the recalled units, Anker says it should be taken to a facility that can safely dispose of lithium-ion batteries due to the risk of fire. Those facilities can be found through the Environmental Protection Agency’s website or other organizations in the US that specialize in processing e-waste. Do not throw them in the trash, recycling bins, or used battery boxes provided at various retail locations.
The recall is also a reminder that power banks and backup batteries can potentially develop severe issues over time, as these particular units are almost a decade old. If you’ve been regularly using devices featuring lithium-ion batteries for a while, you’ll want to be mindful of issues like overheating or visible swelling and dispose of them properly if you think there’s a potential problem. And while the technology is currently more expensive than lithium-ion batteries, you can also consider upgrading to solid-state batteries which are more powerful, safer, and longer lasting than what we commonly use now to power our devices.

'No Kings Day': Thousands to protest Trump in Metro Detroit and across the country

'It takes the hood to save the hood': United Playaz expands its work in San Francisco

Community leaders urge peace, safety at Dallas’ ‘No Kings’ protest on Saturday

Miami Beach foot pursuit ends with suspect struck by police SUV, video shows

Boston Public Health Commission says person with measles visited Boston – Boston News, Weather, Sports | WHDH 7News


-

 West7 days ago
Battle over Space Command HQ location heats up as lawmakers press new Air Force secretary
-
 Technology1 week ago
iFixit says the Switch 2 is even harder to repair than the original
-
 World1 week ago
EU-Ukraine trade reset: What comes after tariff-free access expires?
-
 Politics1 week ago
Hawley clashes with UPenn law professor over judicial injunctions
-
 Technology1 week ago
The single best wireless controller I’ve ever used
-
 Business1 week ago
How Hard It Is to Make Trade Deals
-
 Movie Review | FlickDirect") Movie Reviews1 week ago
Movie Reviews1 week agoPredator: Killer of Killers (2025) Movie Review | FlickDirect
-
 News1 week ago
Trump’s Higher Steel Tariffs Sour Mood at Deal-Making Table