Five minutes into Google’s I/O conference in May, Verge staffers started taking bets on how many times “AI” would be mentioned onstage. It seemed like every presenter had to say it at least once or get stuck with a cattle prod by Sundar Pichai. (In the end, we stopped betting and made a supercut.) Watching WWDC, though, the book ran in the opposite direction: would anyone from Apple mention “AI” at all? It turns out, no, not even once.
Technology
For better or worse, Apple is avoiding the AI hype train
/cdn.vox-cdn.com/uploads/chorus_asset/file/24706369/1496199225.jpg)
The technology was referred to, of course, but always in the form of “machine learning” — a more sedate and technically accurate description. As many working in the field itself will tell you, “artificial intelligence” is a much-hated term: both imprecise and overdetermined, more reminiscent of sci-fi mythologies than real, tangible tech. Writer Ted Chiang put it well in a recent interview: what is artificial intelligence? “A poor choice of words in 1954.”
Apple prefers to focus on the functionality AI provides
Apple’s AI allergy is not new. The company has long been institutionally wary of “AI” as a force of techno-magical potency. Instead, its preference is to stress the functionality of machine learning, highlighting the benefits it offers users like the customer-pleasing company it is. As Tim Cook put it in an interview with Good Morning America today, “We do integrate it into our products [but] people don’t necessarily think about it as AI.”
And what does this look like? Well, here are a few of the machine learning-powered features mentioned at this year’s WWDC, spread across Apple’s ecosystem:
- Better autocorrect in iOS 17 “powered by on-device machine learning”;
- A Personalized Volume feature for AirPods that “uses machine learning to understand environmental conditions and listening preferences”;
- An improved Smart Stack on watchOS that “uses machine learning to show you relevant information right when you need it”;
- A new iPad lock screen that animates live photos using “machine learning models to synthesize additional frames”;
- “Intelligently curated” prompts in the new Journal app using “on-device machine learning”;
- And 3D avatars for video calls on the Vision Pro generated using “advanced ML techniques”
Apart from the 3D avatars, these are all fairly rote: welcome but far from world-changing features. In fact, when placed next to the huge swing for the fences that is the launch of the Vision Pro, the strategy looks not only conservative but also timid and perhaps even unwise. Given recent advances in AI, the question has to be asked: is Apple missing out?
The answer to this is “a little bit yes and a little bit no.” But it’s helpful to first compare the company’s approach with that of its nearest tech rivals: Google, Microsoft, and Meta.
Of this trio, Meta is the most subdued. It’s certainly working on AI tools (like Mark Zuckerberg’s mysterious “personas” and AI-powered advertising) and is happy to publicize its often industry-leading research, but a big push into the metaverse has left less space for AI. By contrast, Google and Microsoft have gone all in. At I/O, Google announced a whole family of AI language models along with new assistant features in Docs and Gmail and experiments like an AI notebook. At the same time, Microsoft has been rapidly overhauling its search engine Bing, stuffing AI into every corner of Office, and reinventing its failed digital assistant Cortana as the new AI-powered Copilot. These are companies seizing the AI moment, squeezing it hard, and hoping for lots of money to fall out.
So should Apple do the same? Could it? Well, I’d argue it doesn’t need to — or at least, not to the same degree as its rivals. Apple is a company built on hardware, on the iPhone and its ecosystem in particular. There’s no pressure for it to reinvent search like Google or improve its productivity software like Microsoft. All it needs to do is keep selling phones, and it does that by making iOS as intuitive and welcoming as possible. (Until, of course, there’s a new hardware platform to dominate, which may or may not be emerging with the Vision Pro.)
There’s only one area, I think, where Apple is missing out by not embracing AI. That’s Siri. The company’s digital assistant has been a laughing stock for years, and although Apple arguably invented the digital assistant as a consumer market, it’s clear it’s no longer a priority for the firm. The most significant Siri news at this year’s WWDC was that its trigger phrase has been shortened from “Hey Siri” to “Siri.” That’s it. In a world where AI language models are vastly improving the ability of computers to parse language and opening up new possibilities in fields like education and health, Apple’s biggest announcement was making the wake word for a product most of us ignore just three letters shorter.
There’s reason to be cautious, of course. As Cook mentioned in his GMA interview, there are all sorts of problems associated with software like ChatGPT, from bias to misinformation. And an image-obsessed corporation like Apple would be particularly wary of headlines the launch of Bing and Bard generated. But how long can the company sit on the sidelines? And will a push into VR distract it from reaping comparatively attainable rewards in AI? We’ll have to wait until the next WWDC. And start counting mentions of “machine learning.”
Continue Reading
/cdn.vox-cdn.com/uploads/chorus_asset/file/25418050/869916952.jpg)
Blizzard has announced it will not hold BlizzCon, the publisher’s annual fan convention, this year. “After careful consideration over the last year, we at Blizzard have made the decision not to hold BlizzCon in 2024,” Blizzard wrote on its website.
Instead of BlizzCon, Blizzard wrote that it would be holding other, smaller events throughout the year and mentioned participating in other trade shows, such as Gamescom. Additionally, 2024 marks the 30th anniversary of World of Warcraft, with Blizzard stating that it’s planning “multiple, global, in-person events” as well as sharing updates for WoW’s 10th expansion, The War Within, and Diablo IV’s first expansion, Vessel of Hatred.
Despite this year’s cancellation, Blizzard says the event will return in the future: “While we’re approaching this year differently and as we have explored different event formats in the past, rest assured that we are just as excited as ever to bring BlizzCon back in future years.”
The cancelation of BlizzCon 2024 comes as another notable video game event, E3, finally gave up the ghost last year and amidst a video game industry grappling with unprecedented layoffs and financial struggles. Earlier this year, Microsoft laid off 1,900 employees across Activision Blizzard and Xbox, one of the largest single video game industry layoff events of the last two years.

It’s natural to be leery regarding the ways in which people may use artificial intelligence to cause problems for society in the near future. On a personal level, you may be concerned about a future where artificial intelligence takes your job or creates a Terminator that comes back in time to try to eliminate a younger you. (We admittedly might be overthinking that one.)
One fear regarding AI on a personal level that you should know about because it’s very much in the present is the creation of deepfake photos, including those that strip you of the most basic of privacy rights: the right to protect images of your body.
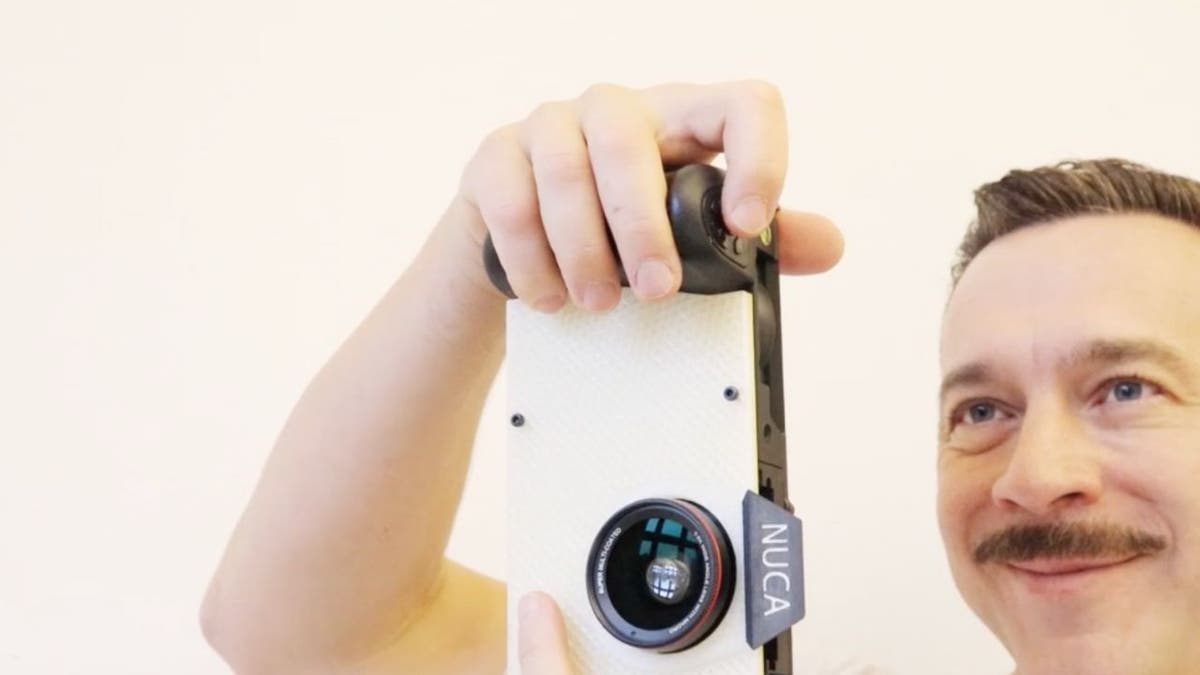
Two German artists recently created a camera called NUCA that uses AI to create deepfake photos of subjects by stripping away their clothing. The automated removal of the photo subject’s clothing occurs in close to real-time, speeding up the creepy factor exponentially.
CLICK TO GET KURT’S FREE CYBERGUY NEWSLETTER WITH SECURITY ALERTS, QUICK VIDEO TIPS, TECH REVIEWS AND EASY HOW-TO’S TO MAKE YOU SMARTER
Why would someone create an AI camera that removes clothing?
The two German artists, Mathias Vef and Benedikt Groß, decided to create the camera to show the implications of AI’s rapid advancements. The pair were trying to think of the worst possible uses of AI to affect someone’s privacy, and they realized that the technology needed to create a camera like NUCA was already possible.
WHAT IS ARTIFICIAL INTELLIGENCE (AI)?
The two artists hope that people will consider the dangers of continuing to develop AI technologies like this, which could eliminate the expectation of privacy. They hope it will spark debates about the direction of AI.
MORE: HOW SCAMMERS HAVE SUNK TO A NEW LOW WITH AN AI OBITUARY SCAM TARGETING THE GRIEVING
How does a camera that digitally strips away clothing work?
The German artists used 3D design and print software to create the lenses and the shell for controlling the camera. It then uses a smartphone on the inside of the shell that handles the image capture. NUCA passes the photo to the cloud for the application of AI that removes the subject’s clothing.

The result of NUCA camera using AI to strip away clothing. (NUCA)
Of course, NUCA is not actually creating a photo of your naked body. Instead, it analyzes your gender, face, age and other aspects of your body shape to develop a replication of what AI believes your naked body would look like.
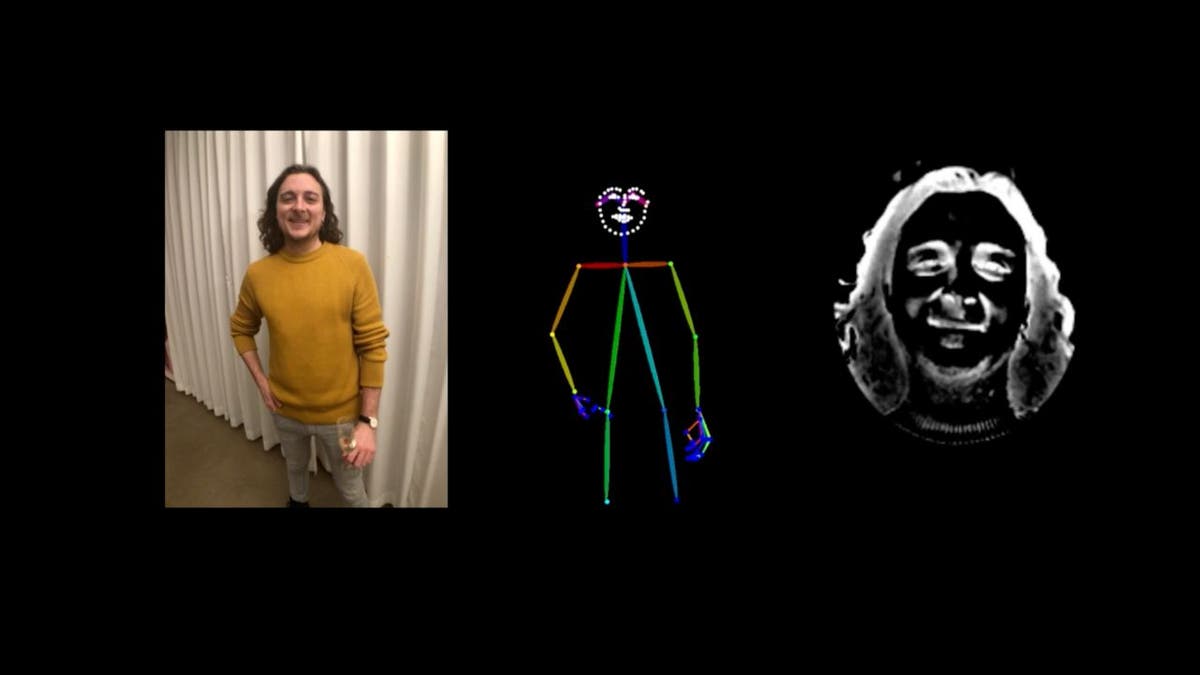
Illustration of what NUCA camera analyzes to create image. (NUCA)
MORE: ARE AI DEEPFAKES THE END OF ACTING AS WE KNOW IT
Doesn’t deepfake nude photo technology already exist?
Deepfake nude photos, usually of celebrities, have been around for a long time on pornography websites, but the photos from NUCA require almost no technical know-how.
Even more frightening, NUCA is able to perform the process within about 10 seconds. The immediacy of the creation of the deepfake nude photo is what sets NUCA apart from other fake nude photos that typically require quite a bit of editing skill and time.

MORE: AI WORM EXPOSES SECURITY FLAWS IN AI TOOLS LIKE CHATGPT
NUCA’s deepfake dilemma: Artistic innovation or ethical Invasion?
Bottom line: Anyone could use the technology that’s found with NUCA to create a deepfake nude photo of almost anyone else within several seconds. NUCA doesn’t ask for permission to remove your clothing in the photo.
It’s worth emphasizing again that the two artists have no plans to allow others to use NUCA for commercial gain. They will showcase its capabilities in late June at an art exhibition in Berlin all in an effort to spark public debate.
However, the next people who develop a similar technology may choose to use it in a far different way, such as to potentially blackmail people by threatening to release these fake nude photos that other people won’t necessarily know are fake.

Kurt’s key takeaways
If it feels like AI is expanding wildly in dozens of different directions all at once, you aren’t all that far off. Some of those directions will be helpful for society, but others are downright terrifying. As deepfakes continue to look more and more realistic, the line between a fake digital world and reality will become increasingly difficult to discern. Guarding our privacy will almost certainly be more and more difficult as AI strips away our safeguards … and, potentially, even our clothing.
Are you concerned about AI-created deepfake photos and videos affecting you personally? What safeguards should exist around the use of AI? Let us know by writing us at Cyberguy.com/Contact
For more of my tech tips & security alerts, subscribe to my free CyberGuy Report Newsletter by heading to Cyberguy.com/Newsletter
Ask Kurt a question or let us know what stories you’d like us to cover.
Answers to the most-asked CyberGuy questions:
Copyright 2024 CyberGuy.com. All rights reserved.
/cdn.vox-cdn.com/uploads/chorus_asset/file/25415594/Squad_Busters_key_art.jpg)
Supercell doesn’t release a lot of games, but the studio’s mobile releases tend to be big hits. Think Clash of Clans, Brawl Stars, and Clash Royale. Now, the developer is gearing up for its next major release: Squad Busters, which will be out globally on both Android and iOS on May 29th.
It’s a competitive multiplayer game, but one on a larger scale than a typical mobile release. In each match, 10 players compete to collect the most gems while building up a squad of computer-controlled characters. It’s sort of like a simplified MOBA: you move your team around fighting minions, earning cash that lets you improve and grow your squad before you eventually start fighting other players and going for the big gem pile in the middle of the map. It also has a bit of a Smash Bros. vibe, as the cast of characters are all pulled from popular Supercell games.
The studio is known for experimenting with different games and genres, and it’s also known for not moving forward with titles that it doesn’t think will become a Clash-level hit — which means the developer seems to have a lot of faith in Squad Busters, which is currently in soft launch in a number of territories, including Canada, Mexico, Spain, Denmark, Norway, Sweden, Finland, and Singapore.
“Our dream is to create great games that as many people as possible play for years and that are remembered forever,” Supercell CEO Ilkka Paananen said in a statement. “Huge credit to the Squad Busters team — it’s already apparent that the game has such high potential, making it our first company game launch since Brawl Stars in 2018.”

Maryland3 mins ago
MD City Among Money's 50 Best Places To Live

Michigan8 mins ago
'Uncommitted' organizers will join campus protesters in Michigan over Gaza
Massachusetts11 mins ago
Robots with weapons? Bill would make that illegal in Massachusetts

Minnesota14 mins ago
Politics Friday: Changes are ahead on the Minnesota Supreme Court as one justice steps into retirement

Mississippi17 mins ago
Man charged after girlfriend’s body found in yard of abandoned home in Mississippi

Midwest2 years ago
See it: Tesla crashes into Columbus convention center at 70 mph

Colorado2 years ago
Colorado Rockies game no. 116 thread: Zac Gallen vs José Ureña

South1 year ago
Fox News Politics: Georgia the whole day through

South2 years ago
Death of missing Oregon girl found in stream ruled homicide

South1 year ago
At least 2 dead as tornadoes hit Alabama, damage homes across Southeast

Politics3 hours ago
911 call transcript details Democratic Minnesota state senator’s alleged burglary at stepmother's home

World4 hours ago
Haiti Prime Minister Ariel Henry resigns, transitional council takes power

News4 hours ago
First cargo ship passes through new channel since Baltimore bridge collapse

Politics10 hours ago
Biden admin cracks down on power plants fueling nation's grid

World11 hours ago
Spanish PM Pedro Sanchez suspends public duties to 'reflect'
-
 World1 week ago
If not Ursula, then who? Seven in the wings for Commission top job
-
 Movie Reviews1 week ago
Film Review: Season of Terror (1969) by Koji Wakamatsu
-
 News1 week ago
GOP senators demand full trial in Mayorkas impeachment
-
 Movie Reviews1 week ago
Movie Review: The American Society of Magical Negroes
-
 Movie Reviews1 week ago
Short Film Review: For the Damaged Right Eye (1968) by Toshio Matsumoto
-
 World1 week ago
Croatians vote in election pitting the PM against the country’s president
-
 World1 week ago
'You are a criminal!' Heckler blasts von der Leyen's stance on Israel
-
 Politics1 week ago
Trump trial: Jury selection to resume in New York City for 3rd day in former president's trial